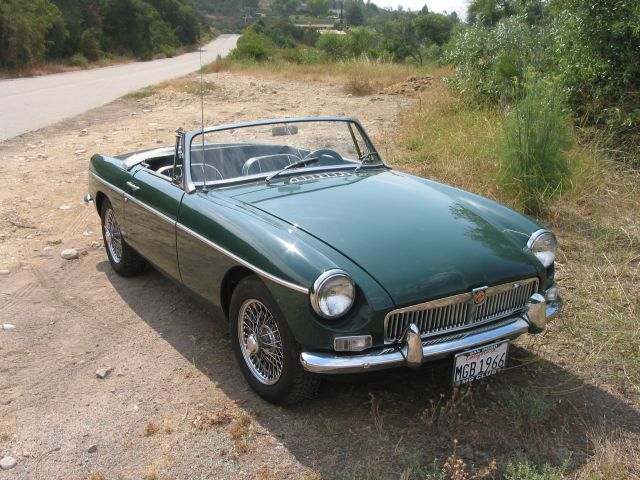
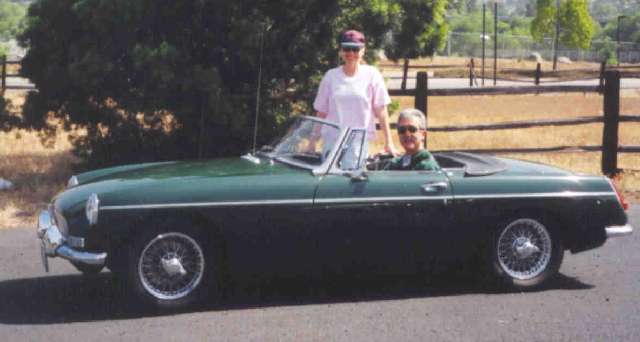
Site Home Other MGB's
Nut and Bolt Sizes
The San Diego MG Club
YouTube - University Motors
MG's in the Movies
Rebuilt Cylinder Head Rebuilt Front Shocks

My 1966 MGB

This Page last updated on .

Oct 2023 I've sold my LBC. It is on its way to a dealer in France where I'm sure it will be sold to someone who will be its next caretaker. Sold on bringatrailer.com. I'll keep this web page up for a little while until my memory of this car fades.

Feb 2024 The car has reached the dealer, Paul's Classic Cars, in Créances.
It is for sale on their web site.

Here is my 1966 MGB. It is car number GHN3L76388. Five main bearing high compression engine number 18GB-U-H 24625. Built probably in December of 1965 or January of 1966 (the first 1966 model cars were built in Oct of 1965 and either 75243 (from Moss Catalog) or 79362 (from Original MGB) was the first car built in 1966). The car has been rewired for negative earth. The odometer reads about 25,000 but I have no idea what the real mileage is. The car came with four boxes of spare parts and yet to be installed new parts (typical, I guess, for MG's). There is one more box that the previous owner is still trying to find - the one with all the restoration records in it. The box was found and now I have all the restoration records. The British Racing Green used on this car is Dupont #8194. Its a medium dark green, factory code GN29. If you have a 1966 MGB, I'd like to hear from you. You can email me, Mark DiVecchio, at :  markd@silogic.com . Click here to see cars of people who have contacted me.
My 1966 MGB Roadster - This car was restored in New Hampshire from 1992 to 1995 by Greg Coronis. I've been in contact with Greg and he has been very helpful in reconstructing some of the history of the car (I've added his comments throughout this page). Greg bought the unrestored car for $3,000 on 15 Aug 1992. It was repainted in its original British Racing Green. The restoration was to produce a drivers car, not to 100-point concourse quality. The wheels and rear axle were taken from a 1969 MGB GT. Externally, the car looks perfect. The body has had all rust removed and body panels repaired (and the underside/rockers have been sprayed with WaxOyl). The interior is new leather. The chrome and wire wheels are excellent. The power plant is restored and enhanced. The electrical system was changed from positive to negative earth. The two 6 volt  batteries were replaced with one 12v battery. The steering wheel is not an original type. The wheels still have the eared type of wheel nut. Tires are Michelin MXT4 175/70 R14.
This is the commonly called the MK I version of the MGB. The first one built was for the 1963 model year. Its production followed several years of MGA production which itself followed almost 20 years of TA-TB-TC-TD-TF cars. As I bought it, a radio was not installed although a radio antenna is on the right front wing (but I got one BMC radio and one BL radio in the boxes of spare parts). There are no sun visors (they were an option) and there are no external rear view mirrors (also an option) although I added a driver side door mirror in 2004..
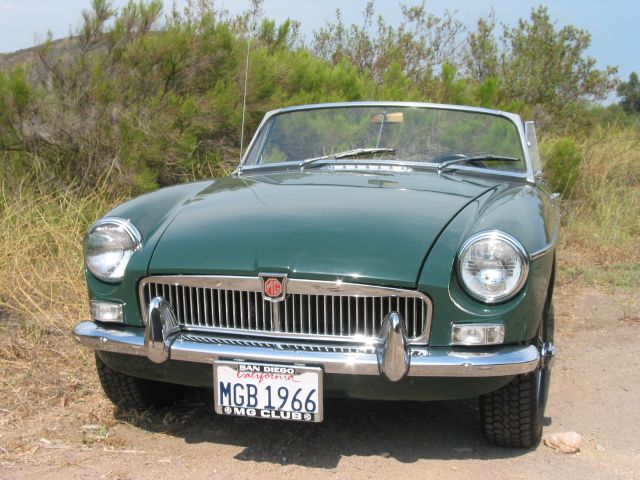
The car is called a "chrome bumper" car. Chromed bumpers were replaced by rubber bumpers in 1974 to meet new federal bumper height and the 5 mph guidelines. The chromed grill lasted until 1969 when it was replaced with a black grill. The front bumper overriders had a rubber buffer added at the same time. The side/flasher lamps are white. The front anti-roll bar is installed.
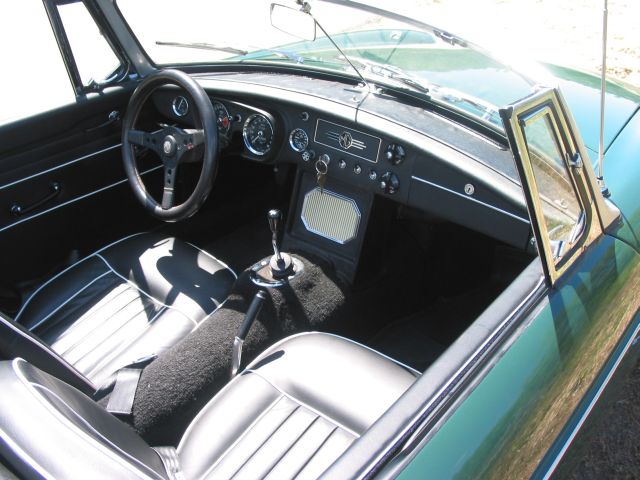
Here you can see the pristine interior with the non standard steering wheel. Black leather with white piping. The horn button is still in the center of the steering wheel, where it stayed until the 1977 model. A radio will someday replace the rectangular plate in the center of the dash with the speaker installed below it (I've since installed a radio - see below). The dashboards through 1967 were metal painted with a black wrinkle finish. Seat backs are adjustable but you have to use a spanner (wrench). The direction indicator switch has the optional headlamp flasher. The choke knob is the newer style with the "fan" symbol. (I've since changed it to the one with the "C" on the knob - correct for 1966.)
The car does not have overdrive and, in 1966, first gear still was not synchro. The car has an oil cooler and twin horns which were fitted to all export cars.
These early MGBs had two windshield wipers and no side badges. By 1966, the MGA style strap-on 12 gallon gas tank was replaced by a 14 gallon screw-on tank. The brakes are a single line system, not getting dual line system until 1968. The system uses silicone brake fluid. The brake lights actually work (but not very well) from a pressure switch in the brake line rather than by a simple push button switch activated by the brake pedal itself. On the doors, the older style pull-out door handles were replaced by push button handles starting in 1965.

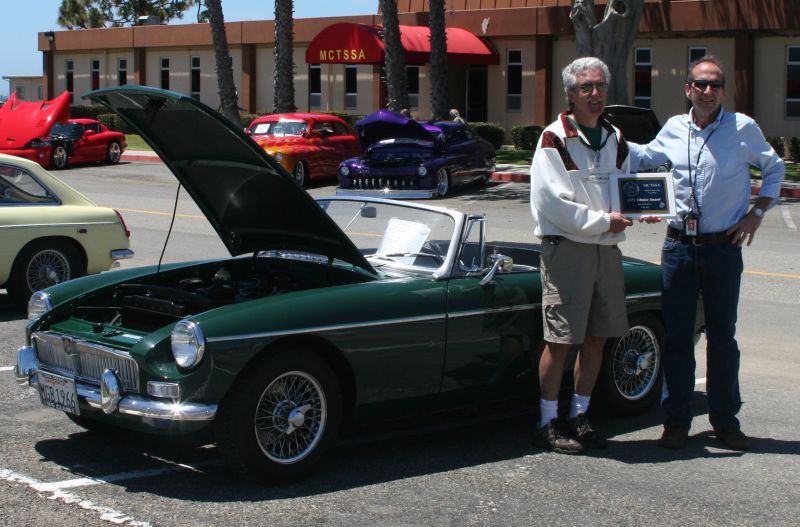
The car came with a San Diego MG Club license plate holder. I'm a member of that club. Notice here, no backup lights and the rear lights are red for both the side/flasher lights and the brake lights.
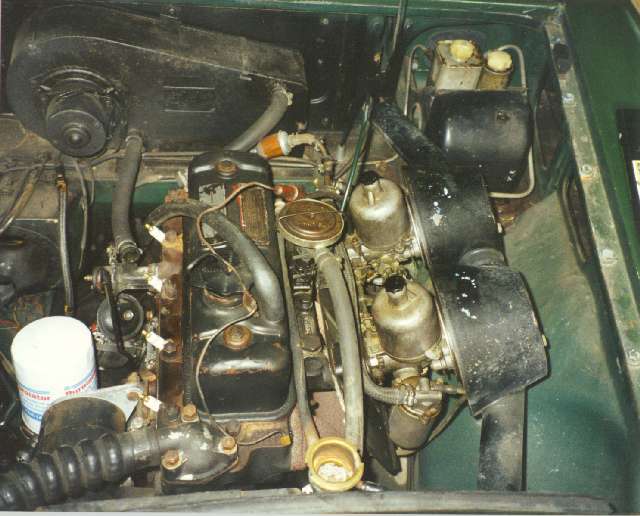
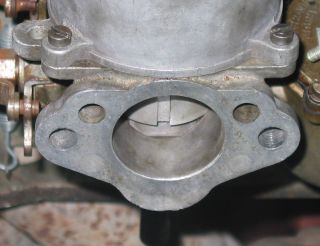
Uses dual SU model HS-4 carburetors with a manual choke (AUD9209 and AUD9210). The cylinder head is the correct head for 1966....... I replaced the incorrect head which was on the car when I bought it.

Emission control equipment consists only of a PCV valve.

The electrical system uses a 12 volt DC generator and the 2 six volt batteries have been replaced by a single 12 volt Sears DieHard.

The replaceable element oil filter was replaced with a hanging spin-on filter conversion (the original filter parts were in the boxes of spares). To read about horror stories when removing the filter, read this article. This happened to me the when I changed the oil filter. This is the Moss Motors part 235-940. In all fairness to Moss, when I put the new oil filter on (a FRAM), there were no problems with assembly or leakage. I only hand tightened the filter. Moss sent me a PDF file of the instruction sheet and the part number for a replacement rubber seal if I ever need to replace it.

The distributor cap and coil are modern replacements (Coil is a 40Kv Lucas Sports Coil).

The engine is painted dark red. The starter is of the Bendix spring operated type.

For a photo of  what the engine compartment looked like before the restoration, click here. Also notice in that picture that the head has the 4 holes for the air pump injectors. Greg Coronis says that when he got the car, this was the head it had. He does not know why it was installed. He also told me that when he had the engine rebuilt, he had hardened valves and seats installed. If you look just below that photo, there is a photo of the engine compartment before I replaced this head with the rebuilt correct year head. Click here for that story.

Compare with this before photo (This is one of the few "before" photos that Greg sent me):

Greg sent me a before photo of the engine compartment. You can see that the head with the air pump connections was on the car before the restoration began.
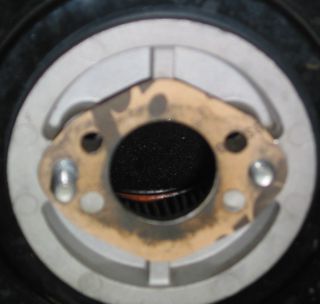
Here is a photo of the engine compartment before I replaced the cylinder head.

The cylinder head was odd. It had 4 holes for the air pump injectors as used starting in 1968. The holes were pluged as the 1966 year did not have an air pump. The 1966 head was designed to use leaded gas - which of course is no longer available. I don't know why the head was changed. The head has "PAT No. 565394" molded into it at the front. Greg Coronis says that when he got the car, this was the head it had. He does not know why it was installed. He also told me that when he had the engine rebuilt, he had hardened valves and seats installed.
Here is the engine compartment with the new cylinder head. Click here for the story.
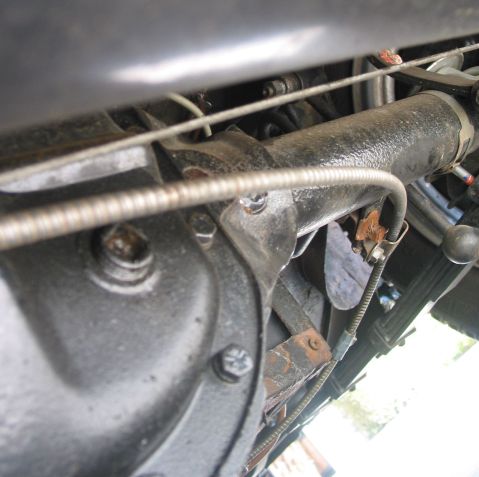
Rear axle is of the tubed Salisbury type. This is fairly odd as well. MGB GT production started with the 66 model year (car 71933) and it used the tubed type rear axle from the start. It wasn't until middle of 1967 (car 132923) that the tubed type was fitted to all roadsters. Greg told me that when he bought this car it orginally had steel wheels. At the same time, he bought a 1969 MGB GT with wire wheels. He took  the rear axle and the front spindles from the GT and moved them to this car after they were restored.


My No Longer Owned 1977 MGB


Here is the 1977 MGB which I used to own. I bought this one in 1982 and sold it in 1994. It ran great once I replaced all the electrical components (mostly the Lucas electronic ignition, alternator and electrical relays). It is a much more modern car than my 1966 (this one had sun visors and headrests). I am sorry I sold it. MGB's were only made until 1980.


Sources:


MGB Automotive Repair Manual, Haynes, 1989, ISBN 0 85696 623 1 Original  MGB, Anders Ditlev Clausager, 1994, ISBN 1 879979 48 6


Restoration Manual MGB, Haynes, 1998, ISBN 1 85960 607 5 MGB The Illustrated History, Haynes, 2nd Ed, 1993, ISBN 0 85429 948 3


The Complete Official MGB.
All available from Moss Motors. While you are there, ask for a copy of their MGB catalog.


MGB Drives and Rallyies


(I lost the photo)
XXXIII Ball Bearing Breaker Rallye   18 May 2003
San Diego MG Club
XXXIV Ball Bearing Breaker Rallye     16 May 2004
San Diego MG Club
25th San Diego British Car Day and Picnic    3 Oct 2004
San Diego British Car Club Council
(That's my car in the middle of the photo - in case there was any doubt!)


The work that I've done on the car

 
Plans and upgrades
Done Date
Notes
1. Replace 3 point seat belts with 3 point inertia reel belts
5/7/03
An easy change that makes for much more comfortable driving. Saved old belts. Here is a photo (right side) of the mounting of the inertia reel on the wheel well behind the seats.

2. Fix choke
5/2/03
The choke cable was not fully opening the choke. Could only pull out the knob about 1/4 inch. Found that the lever on  the choke control arm between the cabs was not in the correct position. Adjusted the position of this lever and now the choke knob can be pulled out about 1-1/2 inches. The car starts much better now, only after about 5 seconds of cranking.
3. Handbrake does not hold
5/7/03
This car has a tubed rear axle installed. I removed the left brake drum and it was clear that the handbrake lever was not moving the brake shoes at all. Figuring that they were somehow defective, I ordered two new handbrake levers from Moss. When they got here, I removed both rear drums and shoes. When I did this, I noticed that the levers have a handedness (left and right). I was able to compare them with the parts I got from Moss which were marked L/H and R/H. The levers as installed in the car were reversed. Must have been done by whoever did the brake rebuild. I swapped the levers, installing new boots at the same time. Adjusted the brake shoes and now the handbrake works like a champ. And, of course, one of the great things about Moss is that I returned the levers and got a full refund (less shipping).
4. Install AM Radio


7/10/03


9/18/03


9/14/07

8/8/24
I've got two to choose from. One marked BRITISH MOTOR CORPORATION and one marked BRITISH LEYLAND. One has no knobs and one has just the larger outside knobs. Both work. The BL radio is negative earth, the BMC one has a switch to select either earth setting. I've just picked up a third radio at a thrift store. Is is an AM/FM radio, made in Japan, and has a polarity reversing switch. It works as well but like the other, it has no knobs. I got an original AM radio via eBay that had knobs and the mounting plate. The radio works but the one I had is in better condition (less rust on the radio body). I've moved all the knobs to the radio I had. I also got an original speaker grill and speaker via eBay. Now I have all the parts so I have to figure out how to get the radio into the dash from the rear. Here is a picture of the radio that will be installed. I've temporarily installed the radio (laying it on the floor) connecting it to the new speaker and it works fine. Practically no ignition noise. Volume is adequate to get over all but freeway road noise.

I figured out how to get the radio into the dash. I just needed to remove the heater temperature control and move it out of the way. Now I see that I need to build some sort of  rear support for the radio

Finally done. Here is a photo.


I've sold the older BMC radio to Alan Holcombe. He installed it in his B. Here is a photo that he sent me.

The radio has stopped working.
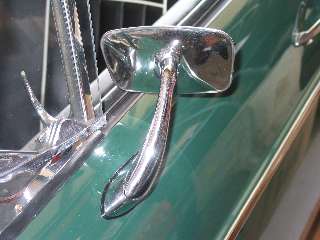
5. Replace choke cable
6/10/03
The car should have a knob with "C" on it. The one that is there has the fan symbol which was used in later cars. I ordered an aftermarket cable from Moss. Received and Installed. You can also see it in the photo of the radio, above.
6. Outside wing mirrors


3/1/04


4/1/05
I got 4 mirrors in the boxes of spare parts with the car. Three are Lucas style wing mirrors (like Moss 165-400) [one is original and the other two are modern reproductions] and the other is a door mirror from 1968-71 (like Moss 165-220).  I'm really used to outside mirrors so I'm going to install them. These were a period option.

I've installed the door mirror. It was not too hard. I had to drill two ¼ inch holes in the door. It really does improve the rear view for passing. I've not decided yet if I am going to install the wing mirrors. Here is a photo.


Here is a photo of an original mirror. Someday I may replace mine. I saw this one at the 2005 British Rolling Car Day.

Original 1966 Mirror?
7. Install K&N Filters

Expensive but supposed to increase horsepower.
8. Install sun visors

An option. Moss sells a kit with all mounting hardware.
9. Install map pocket

An option. Moss sells them but does not have the finisher.
10. Replace shift lever and knob
5/13/03
The shift lever does not appear to be original. I have the original knob. Well, I found a picture on page 84 of Original MGB that shows the same bent shifter and pear shaped black shift pattern knob. Looks like this is original - no changes needed.
11 Check shift into reverse
6/12/03
To get into reverse, I have to pull the shift lever UP. Got to figure why. In the owner's manual, it just says to "move the lever to the left of the netural position until resistance is felt". Well its OK. Just needed to push a little harder to the left.
12. Ignition Warning Light never comes on
5/9/03
Supposed to come on when engine is not running or running at a very low speed. Turned out that just the indicator lamp was burned out.
13. Decals and Stickers
5/13/03
I've installed Coopers decals for the air cleaners and a Negative Earth decal for the engine compartment (this car was originally positive earth but was re-wired). I think there is a second Negative Earth decal that goes between the two battery compartments.
14. Cylinder Head
10/22/03


10/22/03

3/1/08
Figure out why the head on the engine is one with air pump injection holes (which are plugged since air pumps weren't installed until 1968.

I spoke with Greg Coronis and he said that this head was on the car when he bought it.

I have just completed replacing the cylinder head with a rebuilt correct year head. I got the head from a fellow member of the San Diego MG Club. This head was rebuilt with hardened valves and seats. Click here for the story.
15. Wire harness cloth covering needs to be replaced

In many sections, the cloth wire harness cover has come off. The wires are in fine shape. I wonder if replacment material is available?
16. Move front license plate lower
5/9/03
It appears that the front license plate should be lower down. With the top of the plate even with the bumper. I could see this on most of the MGB pictures that I've seen. Done, I just reversed the mounting brackets.
17. Worry about unleaded gas and Octane
Don't worry about it.

10/22/03


3/1/08
I have to figure out the issues with using unleaded gas. I don't know if the head has had new valve seats and valves installed. I'm trying to track that down. Everyone has told me not to worry, can't do anything about it anyway. When the valves go bad, replace them with hardened valves.

I spoke with Greg Coronis and he said that when he had the head restored, it was updated with unleaded gas valve seats.

As you  might have read above, I've replaced the head with a correct head for the car and it was rebuilt with hardened valves and seats.
18. PCV valve
5/13/03
The PCV valve installed in the car when I bought it has a flat top and a non-looped spring. It is dated 3/67. In the box of spares there is a PCV valve dated 10/65 with a looped spring and a bumped top. I'm not sure which is the correct one. They are both marked Smiths. The picture of a 1964 engine in the book Original MGB, shows the flat topped version of the valve. Moss Motors catalog shows the flat top. I'm going to leave the flat top version in the car.
19. Replace clamps

Many of the hose clamps are not the original 'wire' loop style clamps. Need to start replacing these. There is a full bag of these in one of the spare parts boxes. As I was replacing the cylinder head, since I had to remove almost all of the hoses, I replaced almost all of the clamps with the correct 'wire' loop style.
20. Brake lights
7/3/03
The brake lights, which are controlled by a switch IN the brake line, only come on when pressing fairly hard on the brake pedal. The switch may be defective. I've bought another and will replace it. Its tough to replace because I will have to bleed the brake system afterwards. Done. The brake lights now come on with a touch of the brake pedal.
21. Need cup holders
5/24/03
OK, I can't get along without something to hold the can of soda pop. Its especially a problem having to shift the standard transmission. I found some cheap holders which I mounted under the screws that hold the trim ring around the shift lever. They come off in a minute for those high class concourse shows. Here is a photo.
22. New Battery 2/9/06 Time for a new battery. I went to Sears with my old DieHard in tow and they had a perfect replacement. Also a DieHard, stock number 22830326 for $59.99. It is a Group 26 size. Bring your old battery, otherwise there is a $10 core charge. They could tell from the numbers on the old battery that it was purchased in 1996. An amazing 10 year life for a battery in a car not driven every day (or sometimes, every month!).

2024 - I replaced the battery - this time after 17 years.
23. New Cylinder Head 3/8/06
3/14/07
3/1/08
As you  might have read above, I've replaced the head with a correct head for the car. It was rebuilt with hardened valves and seats. Click here for the story.
24. Radiator Rodded 9/28/2008 I should have listened to the recommendations from the guys at the MG Club.

Even with the new cylinder head, my B continued to have hot running issues through the summer. They would come and go but still never completely went away.

So after resisting for a long time, I finally removed the radiator and had it checked. It only took about an hour to get it out. I brought the radiator to Kirk's in El Cajon. Stan "Kirk" Newkirk greeted me at the door and recognized the MGB radiator immediately. He took the radiator over to his "test" station. It was nothing more than a hose with a rubber seal type fitting on the end. He held the radiator upright and put the hose into the inlet. He turned on the water full blast and watched the water coming out of the filler neck. It took him about 5 seconds to say that the radiator was probably 50% blocked. He said that with water going in the inlet and the radiator held in its normal orientation, almost no water should be coming out of the filler - it should all be coming out of the outlet pipe.

So he rodded it out - $80. When I picked it up the next day, he said that he could not get the rod through a couple of the tubes but it was nothing to worry about. He said that in most cases, the blockage was pieces of rust from the engine block.

Again about another hour to reinstall the radiator with new hoses.

Now I think my water temperature gauge is broken -- it never goes above 190 degrees....

25. Professional Tune up Help 9/29/2008 After I got the new cylinder head installed, the engine was not running very well. It was having a lot of trouble getting up small hills. In 2nd or 3rd gear, I could not get the RPM above 3000. In 4th on the freeway, a small uphill would drop my speed down to 50MPH.

I got a lot of advice form other San Diego MG Club members and tried many, many things but I was getting nowhere.

After wrenching my hands and wracking my brains for months, I knew that I needed professional help but chose, instead, to get my car the professional help. I made an appointment with Robert at Harloff Automotive.

I told him of my MGB's troubles and little about its recent history. Robert took it for a ride and he said "it runs a bit sluggish". He checked the ignition system and re-gaped the points. Then he went over the carburetors.

He found:

1. The front carb's air filter was on upside down. Well not the actual filter but the back-plate adapter - the circular metal piece that fits up against the carb. I learned that the adapter has two holes to supply ambient air pressure to one side of the piston. By having the adapter upside down, I completely blocked those holes. Robert said the front carb was "confused" because of that. A real amateur's mistake on my part.

The carb body:


The air filter body.


2. He turned to the rear carb. He removed the float lid and found several pieces of rubber gasket sitting at the bottom of the float chamber. Robert removed them, commenting that they probably effectively blocked fuel flow to the rear carb. I had never looked inside of the float chambers - mistake #2.

3. Then Robert noticed that the piston on the rear carb was sticking. He took it apart but it was not dirty. He loosened the jet, let it recenter and then tightened it. No more sticking. I had noticed the sticking before but it seemed insignificant - mistake #3.

4. Lastly, Robert noticed that the PCV valve was sucking in a lot of air all of the time. He was fairly sure that the valve was defective. To confirm his suspisions, he disabled the valve by placing a rubber cap over the valve inlet after disconnecting the hose. He stuffed the hose into the front air intake so that the engine would still reprocess the crankcase fumes.

He adjusted the idle speed and balanced the carbs and now the car runs well.

Robert, thank you.
26. Clutch Master Cylinder Leaking 10/8/2008 What was this oily stuff dripping on my left shoe everytime that I drove my car?  Aww, its nothing. Opps, the clutch is not disengaging until my foot is almost all the way to the floor.  I looked in the clutch master cylinder and it was almost empty. I could see hydraulic fluid dripping down to the clutch pedal. I thought about doing this myself but reason overtook me. Back to Robert at Harloff Automotive. Another great job. He rebuilt both the master and slave cylinders.
27. Driver Side Shock Absorber Leaking 11/10/08 After noticing that the driver's side wheel was bouncing around a lot, I realized that the shock absorber was not working. I checked the fluid level and found it very low. I filled it with Motorcycle Fork Oil. After about another month, the same problem was occuring. So I ordered two rebuilt shock absorbers from Apple Hydraulics. I was fairly successful in doing the replacement. My story about this is on its own web page.

Here is someome who is doing a restoration http://www.middlebank.co.uk/

Another neat site   http://www.theautoist.com/links.htm

British Nut and Bolt Sizes from the British Tool Company.

San Diego MG Club

San Diego MG Club's Message Board on Yahoo! Groups

British Car Brochures and Advertisements

            Here is an example:  


Awards

(I'm hoping that this section get bigger!!!)

My first award - 2010 at the Camp Pendleton, CA, MCTSSA Multi-Culture Day Car Show.


Mileage Milestones

Some history of the car's odometer and its restoration. This info was mostly taken from the restoration receipts.
Mileage Date Milestone
0 unknown
99,999 unknown I assume that the odometer as rolled over once.
unknown 15 Aug 1992 Greg bought the unrestored car for $3000.
21,041 10 May 1997 Convertible top  installed.
22,377 16 Jul 1999 Apprasial done in Nashua, NM for $15,000.
22,650 10 Oct 2000 Car purchased from Greg and moved to San Diego by new owner (not me).
23,485 10 Apr 2003 I purchased the car from the first San Diego owner.
26,992 29 Sep 2008 Clutch master and slave cylinders rebuilt.
27,053 20 Jun 2009 Just another day in paradise.


Hints and Kints - A place to record tidbits of information
Per the Jan-Feb 93 Octagon, the spin on filter used should be an AC PF 13 or a FRAM PH 43.
I've been told that Sears no longer makes the size 26/26R battery required for this car. In an email, Ray told me that he found an Energizer 26R that fit perfectly.

Now that Greg sent me all the receipts from the restoration, I've gone through them and here are all the sources he used for major services and restoration parts.

Parts
The Roadster Factory
POB 332
Armagh, PA 15920
800-678-8764
Paint
The Eastwood Company
580 Lancaster Ave
Frazer, PA 19355
800-345-1178
Parts
Moss Motors 
Moss Motors, LTD
440 Rutherford Street
Goleta, CA 93117
800-667-7872
Parts
Long Motor Corporation
14600 West 107th Street
Lenexa, KS 66215
800-255-0088
Instrument Rebuild
Nisonger Instrument Sales & Service
570 Mamaroneck Ave
Mamaroneck, NY 10543
914-381-1952
Parts, installed rear axle,
rebuild brakes,
rebuild Carbs
Sports Car Services
RFD 3 Box 662
Putney, VT 05346
802-387-4540
Parts
McLean Enterprises, Inc
14 Sagamore Road
Rye, NH
603-436-1989
Engine and Transmission Overhaul
K.E. Machine Corp
264 South St
Milford, NH 03055
603-672-4724
Wire Wheels
British Wire Wheel
1650 Mansfield St
Santa Cruz, CA 95062
408-479-4495
Convertible Top Frame
The Proper MG
97 Tenney St  POB 201
Georgetown, MA 01833
800-711-3368
Convertible Top and installation Sports Car Services
RFD 3 Box 662
Putney, VT  05346
802-387-4540

New Address:
Sports Car Services
P.O. Box 251
Westminster, Vermont 05158
802-387-4540

Resources


Victoria British Ltd. (part of Long Motor Corp) http://www.victoriabritish.com/
Moss Motors http://www.mossmotors.com/
The Roadster Factory http://www.the-roadster-factory.com/
How to Restore an Old Car http://www.totse.com/en/technology/science_technology/restore1.html
Manuals and Booklets http://www.1978mgmidget.com/manuals_and_booklets.html
AWAKENING A SLEEPING MG http://www.theautoist.com/awakening_a_sleeping_b.htm
Lucas Wiring Colours http://www.spriteparts.com.au/lucas_wires.htm
MGB PRODUCTION MODIFICATIONS http://www.autochart.com/mgb_production_mods.htm
ARP Head Bolt Sets http://www.aptfast.com/APT_Parts/Bseries_Parts/b_Fasteners.htm
SU HS4 Carburetor Tuning http://www.mgexperience.net/article/su-tune.html
MGB PAINT COLOUR CODES http://www.mgcars.org.uk/MGB/mgbpaint.html
http://www.mgb-stuff.org.uk/paint.htm
MGBs Made In Australia http://mgbsmadeinaustralia.org/index.php/thank-yous/
MGB, 50 Years On (from AutoTrader) http://www.autotraderclassics.com/car-article/MGB,+50+Years+On-77405.xhtml
Early MGB.com http://earlymgb.com/Early_MGB_Photo_Gallery.php
MGB 50 at Blemheim Palace http://www.flickr.com/photos/adamliptrot/sets/72157631606067789/show/
The M.G. Car Club of Sweden http://www.mgcc.se/
This MG is still owned by the fellow who bought it new in 1955! http://www.mg-cars.org.uk/mgtf/Pictures/TF9052/Thumbnails/mgtf_tf9052.htm#co


Emails

I've received many emails and photos of other cars since I put up this web page. Click here for that page.


This site prepared and maintained by Mark DiVecchio

email :  markd@silogic.com

DiVecchio HOME
Frazzini HOME
Site HOME 

This site will be under construction for a while.