ADPCM and
Playing Clips from ".mth" Sound Files
This Page last updated on
.
This page describes and has links to my program, ADPCM, to play sound
clips from the .mth sound file.
I am releasing this
program and documentation under the GNU GENERAL PUBLIC
LICENSE Version 3 and GNU Free Documentation
License
Version 1.3. These licenses permit anyone to use the program and the
documentation to produce follow on programs as long as those programs
remain covered by the GNU licenses.
The Free
Software Foundation
web page talks about what "free software" means.
For more information, look on the Open Source Initiative
web site which includes a description of what Open
Source means
and their certification
of the GPL version 3.
Here is the copyright
notice
for those two licenses:
GNU GPL
Remote Train Control Program for Windows
© Copyright 2015 by Mark DiVecchio
Remote Train Control is free software: you can redistribute it and/or
modify it under the terms of the GNU General Public License as
published by the Free Software Foundation, either version 3 of the
License, or (at your option) any later version.
Remote Train Control is distributed in the hope that it will be useful,
but WITHOUT ANY WARRANTY; without even the implied warranty of
MERCHANTABILITY or FITNESS FOR A PARTICULAR PURPOSE. See the
GNU
General Public License for more details.
You should have received a copy of the GNU General Public License along
with Remote Train Control. If not, see <http://www.gnu.org/licenses/>.
GNU FDL
This is part of the Remote Train Control Manual.
© Copyright 2015 by Mark DiVecchi
Permission is granted to copy, distribute and/or modify this document
under the terms of the GNU Free Documentation License, Version 1.3 or
any later version published by the Free Software Foundation; with no
Invariant Sections, no Front-Cover Texts and no Back-Cover Texts. You
should have received a copy of the GNU Free Documentation License along
with Remote Train Control. If not, see <http://www.gnu.org/licenses/>.
Sound File Format
The ".mth" sound file contains engine information and sounds. I looked
at
the sounds, and later, the softkey information only.
My path on this journey started in May of 2016 when I found this
post
by a poster named "Sporadic" on Model Train Forum "MTH Proto-Sound .mth file
structure" dated 31 Dec 2013. He had studied the
sound file format and understood the structure of two pieces of the
sound file:
1. The index (or directory)
2. Sounds
He found the index started at sound file byte offset 0x0100 and went through byte
0x10E0.
Here is a quote from his original posting:
After
banging my head on it for a few days off and on, I managed to figure
out the audio directory structure. Starting at 0x0100 there is a series
of 16 byte records running up through 0x10E0. I don't have all the
fields nailed down yet, but audio sample location and length seems to
be spot on. Everything is referenced by frames (16bit) and sample
offset count. I've tried this with a few PS2 and PS3 files and they all
seem to map correctly. The following is an example of the first 3
records for a PS2 sd70ace file I pulled
(R092PF3SD70ACe_ALL100107aF2X.MTH) that should explain it a little
better. There's more data further in the header section I haven't
worked on yet, but I'm now able to pull all discrete audio from the
file. I'm a ways off from modifying or porting soundsets, but it
definitely seems doable.
Frames are 16bit (65,536 byte frame size).
Audio is referenced as Frame number + offset in sample count.
Audio samples are 4bit ADPCM (i.e. 512 bytes = 1024 samples).
All calculated offsets for audio records are in reference to the beginning of the audio data which is at 0x8000 in the .mth file.

//1st audio record
0x0100: 01 // Frame (Start)
0x0101: 00 00 // Offset sample count into frame for start of audio data (16bit big endian)
0x0103: FF FF FF // majority of records defined this way. when not, references a frame + offset as above. unknown, maybe loop data
0x0106: FF FF FF // majority of records defined this way. when not, references a frame + offset as above. unknown, maybe loop data
0x0109: 00 00 00 // majority of records defined this way. when not, pattern is apperent but haven't analyzed it yet.
0x010C: 01 // Frame (End)
0x010D: CE 79 // Offset sample count into frame for end of audio data (16bit big endian)
0x010F: 0B // not known yet. seems to be a bitmask or referenced in nybbles. probably sample rate and other flags.
//result: start @ 0; end @ 52875; 52875 samples

//2nd audio record
0x0110: 01
0x0111: CE 7A
0x0113: FF FF FF
0x0116: FF FF FF
0x0119: 00 00 00
0x011C: 02 // second frame, so add 65,536 to offset
0x011D: F4 6B
0x011F: 0B
//result: start @ 52876; end @ 128107; 75231 samples

//3rd audio record
0x0120: 02
0x0121: F4 6C
0x0123: FF FF FF
0x0126: FF FF FF
0x0129: 00 00 00
0x012C: 03 // 3rd frame, so start at 65,536*2 this time (frame_size*(n-1))
0x012D: D5 03
0x012F: 0B
//result: start @ 128108; end @ 185603; 57495 samples
Found some more
tidbits last week when exploring newer PS3 files. Found some audio that
wasn't ADPCM! Took some digging and bit fiddling, but ended up 24bit
PCM in big endian. So it seems that page and offset references are by
nybble count, not necessarily sample rate. Not sure why the 4bit
references yet, but it seems to hold true. I threw together a little C#
app and am able to extract all the raw audio data into separate files
as well as play the 24bit PCM within the app. Once I get the ADPCM
decoding and playing within the app I'll post something for people to
play with. Been looking for checksum data, but haven't located it yet.
Nothing in the upper header anyways. Still more stuff to parse between
the directory structure and audio data. |
I tried to contact him but could not. So I took what he found as a
basis and created this program to play clips from the sound file. First
the program looks at the index and creates a table showing each clip
and the playback information about each clip. You can then select a
clip and
play it. The program will play both 4 bit ADPCM and 24 bit signed PCM
clips.
4
bit ADPCM
is "Adaptive
Differential Pulse-Code Modulation". You can Google that!
Its an industry standard method of encoding sound developed in the
1970's at Bell Labs. Originally used on telephone systems with a sample
rate of 8,000 Hz. It was adopted by the Interactive Multimedia
Association in the early 1990's (called IMA/DVI
ADPCM). It's a compressed
format and I used a decompresser written by David
Overton. Since it uses only 4 bits to represent each sample,
it is a lossy encoding. It is NOT
VOX ADPCM (developed by Oki Electric and used by Dialogic Corp.). This distinction is imporant when you create clips to insert into the
sound file.
24 bit signed PCM
uses 24 bits
to represent each sample. It
is not
a compressed format and uses the full 24 bits to represent each sample. It's
Big-Endian! (Google that too!) This is important when you create clips to
insert into the
sound file. Thus the
sound file size is six times larger than 4 bit ADPCM. The result is a
much higher quality sound.
In the table in my program, except for the Length which is decimal, the
other fields
are in hexidecimal. As Sporadic
mentioned on Model
Train Forums,
we don't know exactly what all of the fields mean. I followed his
interpretation from the orginal postings (with a small change - you can
look at the code - its in the ZIP file.). Here is my description of the
fields:
Index - the index
consists of 255-16 byte entries.
Start - the offset
into the sound file of the start of this clip.
End - the offset
into the sound file of the end of this clip.
Length - the length
in decimal of this clip
Data
- not sure what this byte is for. I believe it should represent the
Sample Rate and Format (ADPCM or PCM) of the clip. My program
uses this byte (if
you have "[X] Automatic
Settings" checked) to make a guess at the file
Level,
Sample Rate and Format. It does not always get it right. Here
what
I think I know:
bit 7
(high order bit) 0 =
IMA/DVI 4 bit ADPCM clip
1 = 24 bit signed big endian PCM clip
(PS3 sound
files only)
bit 6 - possibly, with bits 7 &
3, sets the sample rate and format per the table below.
bit 5-4 -
appears to connect the
clip with the volume control that controls it:
00 - Engine
sound clip
01 - Accent
sound clip
10 -
Horn/Whistle sound clip
11 - Bell
sound clip
bit 3 - possibly, with bits 7
& 6, sets the sample rate and format per the table below.
bit 2 - unknown
bits 1-0
- unknown, either "00"
or "11", but mostly "11".
Here are
some suggested values
for the Data byte. You can start with one of these values and then
experiment:
| PS2 |
4
Bit IMA ADPCM |
|
|
Category |
|
|
Engine |
Accent |
Horn/Whistle |
Bell |
|
5512.5 Hz |
4F |
5B |
* |
* |
|
11025 Hz |
0B |
1B 1F |
2F 2B |
3F 3B |
|
22050 Hz |
* |
* |
27 23 |
37 *33 |
|
|
|
|
|
|
|
|
|
|
|
|
|
|
|
|
|
|
| PS3 |
4
Bit IMA ADPCM |
|
|
Category |
|
|
Engine |
Accent |
Horn/Whistle |
Bell |
|
5512.5 Hz |
4B |
5B 5F |
* |
* |
|
11025 Hz |
0B |
1B 1F |
2B |
3B |
|
22050 Hz |
03 07 |
13 17 |
23 *27 |
37 *33 |
|
|
|
|
|
|
|
|
|
|
|
|
|
24
bit big-endian signed PCM |
|
|
Category |
|
|
Engine |
Accent |
Horn/Whistle |
Bell |
|
5512.5 Hz |
8B |
9B 9F |
AB |
BF |
|
11025 Hz |
83 87 |
93 |
A7 A3 |
B7 |
|
22050 Hz |
* |
* |
* |
* |
|
|
|
|
|
|
|
|
*
no examples of this combination seen |
|
An examination of this table seems to show that bits 7, 6, and 3 set
the clip format and sample rate as shown here:
| Bit |
7 |
6 |
3 |
|
|
|
0 |
0 |
0 |
22050
Hz ADPCM |
|
0 |
0 |
1 |
11025
Hz ADPCM |
|
0 |
1 |
0 |
not seen |
|
|
0 |
1 |
1 |
5512.5
Hz ADPCM |
|
1 |
0 |
0 |
11025
Hz PCM |
|
1 |
0 |
1 |
5512.5
Hz PCM |
|
1 |
1 |
0 |
not seen |
|
|
1 |
1 |
1 |
not seen |
|
|
When the ADPCM program has "[X]
Automatic Settings" checked, it uses this
table to take its best guess at the settings for clip format and
sample rate.
Some sounds can repeat. For example the bell, or the diesel engine
rev sound. The repeatable segments of a clip may be a portion of a
clip or may be the entire clip:
|
Start Rep - the
offset into the sound file of the start of a repeatable segment of a
clip.
End Rep
- the offiset into the sound file of the end of a repeatable segment of
a clip.
SM Init-
For IMA/DVI ADPCM clips this is "State
machine
initialization" - for the programers out there : the
ADPCM decompressor is written as a state
machine. The decompressor state machine
requires two pieces of data at startup - the initial state and previous
sound value. When you start a clip from the beginning, both of these
values are usually zero. A repeating segment, which may start in the
middle of
a clip, needs to know these two pieces of data to produce the correct
sound. You can look at the code if you are really interested. For 24
bit signed PCM clips, I don't know what this field in the index used
for because it does sometimes contain a non-zero
value. |
The sound file from the beginning of the file (byte 0x0000) to the
start of
the index
(byte 0x0100) and from the end of the index (byte 0x10FF) to the
first sound
clip
(byte 0x8000) probably
contains engine performance information. The softkeys are stored at
bytes 0x1900-0x191F. The [Edit
Softkeys] button lets you turn these softkeys
on and off. I don't know anything about the engine
performance information.
--- A reminder to always
work with a
copy of your sound file. ADPCM makes changes/edits to the sound file
immediately
mostly without confirmation. ---
(The
ADPCM program has been ported to
Embarcadero
C++ Builder v10.1 Berlin. Thanks to Kevin Rice for
showing that
this was possible.)
Installation and Instructions:
Make a folder, maybe called ADPCM. Open the ZIP file that you downloaded from this page (choose the latest version from the version listing below). The ZIP file contains the program as well as the source code and other support files. Unzip the contents of the zip file
into that folder. You only need three files to actually run ADPCM :
- ADPCM.exe
- lame.exe
- lame_enc.dll
You can delete the other files if you wish.
Start the program by double clicking on "ADPCM.exe". In Windows
Explorer, it may appear as "ADPCM
Application".
Press [Browse]
to choose a sound file. ADPCM can play back most of the
clips for both PS2 and PS3 engines. You can select either ".mth"
files or ".ima" files or ".raw" files. ".ima" files are 4 bit
IMA/DVI ADPCM audio data. The ".raw" files are for 24 bit big endian
signed PCM
audio data. The
clip's
data
format can either be 4 bit IMA ADPCM (PS2 and PS3 engines) or
24
bit big endian signed PCM
(PS3 engines).
For ".ima" or ".raw" files, you can play the entire file by
clicking on [Play Entire
File].
For ".mth" files, press [Analyze]
and the program will list each clip in the index. This
is for ".mth" files only. ".ima" and ".raw" files can only played
directly
with
the [Play Entire File]
button.
If the file is a ".mth" file, the
program can play each clip in the index.
Click in the index for the clip you want to play.
Choose the file Level, the Sample Rate and the Clip Format (or skip
this and let the program take its best quess by checking [X] Automatic Settings). Note that there are random errors in many sound files where the Data Byte is wrong and the clip will not play correctly.
Press [Play Clip]
--- the program converts the
sound to
16 bit PCM and sends it to the default sound card. It's Mono.
When you play the horn/whistle sound, at clip 152,
ADPCM will always play ending clip 153. I
did this to make the horn/whistle sound right when played. If you play
clip 152 with the [Long
Play] button, ADPCM will randomly choose from
ending clips 153, 154, 155 and 156. Watch the
Messages window and you can see which ending that ADPCM randomly
selected. In the engine, clip 153 is the simple normal end of a
horn/whistle. Clips 154-156 are more fanciful endings. When you replace
the horn/whistle clip, you should always replace all 5 (152-156) at the
same time so the horn/whistle sounds right.
If the clip has a repeatable section, you can press the [Play Repeating
Segment] button. The program will play that segment once.
You can press [Stop]
to try to stop playback but the code queues up 20
blocks in advance. It may take 10-20 seconds to actually stop playing a
long clip.
Volume control is a real Windows volume control. Values go from 0 to 15.
"[X] Automatic Setting"
lets the program make its best
guess
at the file Level, the Sample Rate and the Clip Format of the
clip. If you can figure out how I can improve the guesses, let
me know. You
should normally run with this box checked.
The program has actually gotten pretty good at this guess. You can
always override the program by picking Level/Format/Rate explicitly
using the radio buttons. It defaults to [X] checked.
If
you press the [Long Play]
button, which is enabled if a "Repeating
Segment" is present, ADPCM will play the clip while repeating the
segment the number of times shown in the "Rep" field. This
technique is
used, for example, for the bell sound. Setting "Rep" to a higher
number
will cause the bell to ding additional times.
If you click on the title of the left column of the grid,
"Clip # /Offset", the value in that column will toggle from the hex
offset into the sound file to a numeric counting of sounds. The numeric
value of each sound corresponds to the number sent in the "n" command
to the TIU by the RTC
program.
The sound Filename, the clip number, file Level (PS2/PS3), the Sample Rate, the Clip Format,
Automatic Setting status, and Volume are
saved in the Registry for the next time you run the program.
[GetDevCaps]
button shows the result of the call to the Window's function of
the same name. Useful
only if you work with the source code. One of these days, I'm going to remove it from the window.
Hint - If
you click
on "ADPCM
Info" from a popup menu and then click on the [Hide] button, that
annoying copyright window on startup won't appear any more.
Getting Sound Files
You can get (almost) all of the sound files from MTH's web pages.
For example: http://mthtrains.com/20-20246-1
click on "Support"
click on icon that says "ProtoSound"
This will let you download either the sound file which is named "*.mth"
or it will let you download a ZIP file which contains the sound file.
Just open the "*.mth" sound file with the ADPCM program (press [Browse]
or drag & drop the filename).
v 1.1.0 Exporting Sounds to MP3 Files
As
of version 1.1.0, I added the ability to export each sound to an mp3
file. You can:
- export one clip by clicking on [Export mp3] after
you have analyzed a sound
file.
- export all clips by selecting "Export all clips
to mp3"
from any popup menu. The program will go through all of the sounds in
the index and create
individual sound files in the same folder as the ".mth" file.
In both cases, each
sound
file is named with the ".mth" filename followed by the index number of
clip, 1-255, and the extension mp3.
This requires the "lame"
mp3 encoder. You can get version 3.99.5 for Windows here.
Its a zip file. The program "lame.exe"
and the DLL "lame_enc.dll"
must
be placed into the same folder as holds the ADPCM.exe file. You can use
the complementary copy of lame v3.99.5 in the ADPCM zip file that you
download from this web page.
MP3 format does not support the 5512.5 Hz sample rate which is common in
the
sound
files. Lame upsamples them to 8000 Hz when creating the mp3 file.
Other sample rates are used unchanged.
I used this feature to change the ring tones and notification tones in
my cell phone. Now my cell phone toots and whistles like a real engine.
v 1.1.2 Editing the
sound file
Version 1.1.2 of ADPCM ADPCM will allow you to replace a clip
in a sound file with a clip from another sound file. (You can't use the sound file being edited as the source for the replacement - make a copy.)
Instructions:
- Start with a sound file downloaded from the engine's web
page as
I describe in "Getting Sound Files" above. Make a copy of it and work
with the copy.
- Run ADPCM and [Browse]
or Drag & Drop the sound
file into the Filename entry box.
- Press the [Analyze]
button. Note the value for "End of
Sounds" which displays in the "Messages" box. More about this later.
- Scroll down the index table to the clip that you want to
change. Click on that row in the index.
- Then right click on the row and select "Edit Clip" or just
press the [Edit Clip]
button.
- Click on "(o)
Replace clip with a clip from another sound file".
- Press [Browse]
or Drag & Drop the sound file that
you will be taking the clip from. (You can't use the sound file being edited as the source for the replacement - make a copy.)
- Type the Clip Number of the clip in that sound file.
- Press [Do It].
- When the clip transfer is complete, the sound file index
will update and you can look at and test the result of the clip change.
- You can go back to step 4 and change another clip OR
- The sound file can be transfered to the engine using the
DCS Loader.
Notes:
1. If you replace a short clip with a longer clip (look at the Length
field of the clips), the sound file will grow. ADPCM will alert you if
the clip that you are adding causes the sound file to grow larger than
the engine's EEPROM. You should always double check the calculation. If
you
replace a clip with a shorter clip, the unused space is recovered and is
available for
other clips.
2. With a few exceptions, clips seem to be randomly located in the
index depending on the engine. If you put a clip into a
previously empty clip number, the engine will probably not know what to
do with
it. ADPCM will
let you put a clip with a repeating segment into a clip
location that did not have a repeating segment, but the engine
probably
won't know what to do with the repeating segment information.
3. Here are a few of what seem to be fixed clip # locations (indexes
177-186 are probably the best place to put replacement clips):
41
Single Toot
42
Single Toot or
sometimes SXS (Xing
sound) or in older sound files, it's just empty
43
SFS (forward sound)
44
SRS (reverse sound)
80-89 In many engines
the PFA are here. This does not seem to be a universal location.
152 Engine
horn/whistle
153 Ending #1 for the horn/whistle (this
is the
normal ending)
154 Ending
#2 for the horn/whistle
155 Ending
#3 for the horn/whistle
156 Ending
#4 for the horn/whistle
----- you
should always change all 5 of these horn/whistle clips at the same time
157 Bell
177-186
Engine Sounds clips which correspond to S01-S10 on the softkeys.
242 SFS
(forward sound) same as sound 43
255 SXS
(Xing
sound) same as sound 42
4. Do not put a 24 bit PCM clip into a PS2 sound file. As far as I
know, PS2 engines cannot play 24 bit PCM sound clips. PS3 engines can
play both types of sound clips.
5. I've tried this with a few engines and it seems to work. If any
changed clips don't play correctly, you can always just reload the
original sound file back into the engine. That said, I am not
responsible for anything that happens to your engines as a result of
using ADPCM. I use version 5.0 of the DCS Loader.
I'd appreciate hearing any insights you have about other clips and how
they are used.
v 1.1.5 Replacing a clip with clip from another file
Version 1.1.5 of ADPCM allows you to
replace a clip in the sound file with any other sound.
1. Allows you to insert any sound from a disk file into the sound file.
Important
Note: I have had limited success when trying to replace a clip with a
PCM clip generated by Audacity. Sometimes, I get only static. I don't
know why this happens. If you encounter this, consider exporting the
clip from Audacity as a 4 bit ADPCM clip and use that clip in your
sound file edit.
ADPCM will let you insert any 4 bit
IMA-ADPCM or 24 bit big-endian signed PCM sound clip into the sound
file.
You must be careful about the
the new size of the sound file so you don't exceed the EEPROM size. The
program will try to warn you if you exceed the EEPROM size but the
program can only guess at the size and it may be wrong.
The best candidates for replacement are
the Engine
Sounds S01 to S10. Most engines play many of these sounds from the
softkeys. They correspond to index locations 177 to 186. They do not
repeat.
You must convert the sound you want to
insert into a
4 bit IMA-ADPCM or a 24 bit signed big-endian
PCM file. I used Audacity
and sox for
this.
1. Once
your clip (maybe from an mp3 file or recorded from your microphone) is
in Audacity,
make sure the sample rate is set to 5512.5 Hz, 11025Hz or 22050 Hz.
If its not,
resample it. The sound level setting will affect how the sound
plays in the engine.
I can't give you any guidance about this. You will have to experiment.
Remember that
the sample rates are samples per second of sound. One second of 11025
Hz sound using 24
bit signed PCM is 33,075 bytes. The sound file will fill up FAST.
At 4 bit ADPCM
at 11025 Hz, it's only 5,512 bytes (but at lower audio quality).
2. In
Audacity, select File->Export Audio
3. Set
"Save as type" to "Other Uncompressed files"
4. Set
"Header" to "RAW (header-less)"
5. Set
"Encoding" to either "VOX
ADPCM" or "Signed 24 bit PCM" (remember that one file will
be six times
larger than the other). 24 bit PCM is only supported in PS3 sound files
6. Set
"File name" to something
that is meaningful, like "Bells_x4_4bADPCM_11025Hz.vox" for a
VOX-ADPCM clip
or "Bells_x4_le_24bPCM_11025Hz.raw" for a 24 bit
signed
little endian
PCM clip. Press [Save],
press [OK]
on the metadata screen without entering anything.
Note:
Audacity only
generates
little-endian signed 24 bit PCM *.raw
files. See step 8.
Note: The filename must include the sample rate as part of the name for my batch files (shown below) to work correctly.
7. For 4
bit ADPCM
clips, convert the ".vox" file into a ".ima" (or IMA-ADPCM)
file. I use sox
to do the conversion. Command line example:
"C:\Program Files (x86)\sox-14-4-2\sox"
"Bells_x4_4bADPCM_11025Hz.vox" -e ima-adpcm -c 1 -r 11025
"Bells_x4_4bADPCM_11025Hz.ima"
The program zip file contains a batch
file named vox_to_ima.bat
which may help you with this conversion. Here is a listing of that
batch file:
|
Here is a listing
of the vox_to_ima.bat
batch file:
@echo off

if "%~1"=="" (goto error)
Set filename="%~1"
echo.Filename is: %filename%

Set Folder="%~dp1"
echo.Folder is: %Folder%
Set Name="%~nx1"
echo.Name is: %Name%

rem Check that the extension is .vox
set Ext="%Name:~-4,-1%"
rem echo %Ext%
if not %Ext%=="vox" (goto exterror)

rem Strip the extension and replace it for Outname
set Outname="%Name:~1,-5%.ima"
echo.Outname is: %Outname%

set SampleRate="none"
If NOT %Name%==%Name:5512=% (set SampleRate="-r 5512")
If NOT %Name%==%Name:11025=% (set SampleRate="-r 11025")
If NOT %Name%==%Name:22050=% (set SampleRate="-r 22050")
if %SampleRate%=="none" (goto samperror)
echo.SampleRate is: %SampleRate:~1,-1%

rem echo.Current Folder is:
rem
cd /d %Folder%
rem
pause

echo "C:\Program Files (x86)\sox-14-4-2\sox" %SampleRate:~1,-1% %Name% -e ima-adpcm -c 1 %Outname%
"C:\Program Files (x86)\sox-14-4-2\sox" %SampleRate:~1,-1% %Name% -e ima-adpcm -c 1 %Outname%
rem
echo Import this file into a sound file using ADPCM as a 4 bit ADPCM clip
rem
pause
goto end
:samperror
Echo You must have the sample rate as part of the filename
pause
goto end
:exterror
Echo You can only use *.vox files
pause
goto end
:error
Echo You did not enter the input file name.
pause
:end
|
Here is a hint from Sam via the OGR
forum :
So
happy to have found this thread - and really appreciate the work done
to decipher the MTH sound files and assemble a program to manipulate
the sounds inside.
I
have a PS2 steamer pulling my Polar Express around our Christmas
village. Not only were the sounds not really appropriate for
the Polar Express, but the command environment made it so the conductor
announcement car was not functional. This is no longer an
issue!
Following
the directions above, I was able to use ADPCM, Audacity, and sox to
successfully replace all of the engine sounds this afternoon.
The only caveat, I was never able to export from Audacity to
vox format for sox conversion. Instead, when exporting from
Audacity, I set "Save as type" to "(external program)". The
command was specified as
"C:\Program
Files (x86)\sox-14-4-2\sox.exe" -t wav - -e ima-adpcm -c 1 "%f"
allowing
Audacity to pipe its wav output directly into sox, skipping
the intermediate vox step.
Thanks
again!
-Sam
|
8. For 24
bit signed PCM clips,
convert the .raw file from little-endian
to big-endian.
Audacity only
outputs raw files as little-endian.
Sound
files
require 24 bit signed PCM clips to be big-endian.
Maybe the sound
editing program that you use can output directly as big-endian
so you
would not need to do this. I use sox
to do the conversion.
| Random aside: Apple computers (Motorola 68000 based) are typically big-endian,
Intel/AMD based computers (ie Windows) are little-endian. If
you don't know about
Little Indians and Big Indians, you can google "byte ordering" or click
here: Endianness. |
Command line example:
"C:\Program Files (x86)\sox-14-4-2\sox"
-t .s24 -c 1
-r 11025 -B "Bells_x4_le_24bPCM_11025Hz.raw"
"Bells_x4_be_24bPCM_11025Hz.raw"
The program zip file contains a batch
script name le_to_be.bat
to help you with this conversion.
|
Here is a listing
of the le_to_be.bat
batch file:
@echo off
rem Updated 1 Mar 2018
if "%~1"=="" (goto error)
Set filename="%~1"
echo.Filename is: %filename%

Set Folder="%~dp1"
echo.Folder is: %Folder%
Set Name="%~nx1"
echo.Name is: %Name%

rem Check that the extension is .raw
set Ext="%Name:~-4,-1%"
echo %Ext%
if not %Ext%=="raw" (goto exterror)

rem Strip the extension and replace it for Outname
set Outname="%Name:~1,-5%_be.raw"
echo.Outname is: %Outname%

set SampleRate="none"
If NOT %Name%==%Name:5512=% (set SampleRate="-r 5512")
If NOT %Name%==%Name:11025=% (set SampleRate="-r 11025")
If NOT %Name%==%Name:22050=% (set SampleRate="-r 22050")
if %SampleRate%=="none" (goto samperror)
echo.SampleRate is: %SampleRate:~1,-1%

rem echo.Current Folder is:
rem
cd /d %Folder%
rem
pause

echo "C:\Program Files (x86)\sox-14-4-2\sox" -t .s24 -c 1 %SampleRate:~1,-1% -B %Name% -c 1 %Outname%
"C:\Program Files (x86)\sox-14-4-2\sox" -t .s24 -c 1 %SampleRate:~1,-1% -B %Name% -c 1 %Outname%
rem
echo Import this file into a sound file using ADPCM as a 24 bit signed big-endian clip
rem
pause
goto end
rem
:samperror
Echo You must have the sample rate as part of the filename
pause
goto end
:exterror
Echo You can only use *.raw files
pause
goto end
:error
Echo You did not enter the input file name.
pause
:end
|
9. Back
in ADPCM, browse to the file to edited, press [Analyze]
10.
Select the clip to be replaced.
11. Right
click for the popup
menu and select "Edit Clip" or just push the [Edit Clip] button.
12. Set
"Operation" to "(o)
Replace clip with a clip read from a file"
13.
[Browse] or
Drag & Drop
the new sound clip into the Filename field.
14.
Choose a good value for the
"Data Byte" (see the table above for some starting point suggestions)
This is more
difficult because I don't have a sure-fire algorithm that will always
work for this
choice. The initial value is the data byte from the original clip in
the sound
file. The value of this data byte sets the Clip Format,
Sample Rate, and Category of
the sound in the engine. Get it wrong and funny sounds will come out of
the speaker.
My best
suggestion is to create the replacement clip in the exact same format
as the clip to be
replaced and use the value of the data byte from the original clip.
This is not
required, though. I have replaced clips with clips using a different
data byte.
You can also
search through the original sound file, looking at other clips, until
you find one
that matches your new clip, then use the data byte value from that clip.
15. Press
[DoIt] and
the new clip replaces the original clip in the sound file.
16. If
the clip has a repeating
segment, look at the next section titled "Editing an index entry".
2. The functionality with respect to minimizing file length was changed
so this note is not applicable anymore. See note 1 under version 1.4.2.
3. On the index menu, I added a menu item ("Dump this clip to disk") to
dump a clip from the sound to a disk file. Its a straight
extract
and dump. The output file will either be a ".ima" file for 4bit
IMA-ADPCM clips or a "*_be.raw" file for 24 bit signed big-endian PCM.
4. On the index menu, I added a menu item to set the file length to the
highest clip end address in the index. Useful because when you upload a
file from an engine, its length is set to 1MB, 2MB or 4MB. To save time
when it's downloaded to an engine, we don't have to download
the
padding at the end of the file.
v 1.2.0 Editing an index entry
Version 1.2.0 of ADPCM allows you to edit an index entry. You
can
change any of the fields in the index. This feature does not do very
much validation or checking of what you type in. If you make a mistake,
some awful sounds will come out of the speaker. Always work on a copy
of the sound file.
1. Load
and Analyze the sound file you are working on
2. Select
the clip index to be edited.
3. Press
the [Edit Index]
button.
4. Edit
the values as you wish and press the [Ok] button or press
[Cancel].
The sound file is updated, analyzed and displayed for you.
You can use this feature to add a repeating segment to a
clip. The engine probably would not
know what to do with a repeating segment of a clip that replaced a clip
without one.
You have to calculate the Start Repeat Address and End Repeat Address
of your clip. Figure these values based on the sample rate (in
Hz)
times the number of bytes per sample (0.5 for ADPCM and 3 for PCM).
 If
the clip is an ADPCM clip, you must also enter a State Machine
Initialization value (SMInit). The ADPCM program will help you with this. First
enter the Start Repeat and End Repeat Address values. Then when you
play a clip (using the [Play Clip] button) which contains a repeating segment, the program
will display out the
SMInit value. That is, it's the state machine value just before the
Start Repeating sample is played. Look in the Messages window for this:
If
the clip is an ADPCM clip, you must also enter a State Machine
Initialization value (SMInit). The ADPCM program will help you with this. First
enter the Start Repeat and End Repeat Address values. Then when you
play a clip (using the [Play Clip] button) which contains a repeating segment, the program
will display out the
SMInit value. That is, it's the state machine value just before the
Start Repeating sample is played. Look in the Messages window for this:
Play Clip : Repeating the Repeating Segment
PlaySegment: State
Machine Init 0x32015D (0x01D70F)
You may also see the SMInit value displayed like this (from newer versions of the program):
Play Segment: ADPCM SMInit = 0x32015D (0x01D70F)
This lists the SMInit value for this (Start Repeating Address) value.
You can then insert this SMInit value into the index.
v 1.3.0 Adding totally new sounds
With version 1.3.0 of ADPCM comes the ability to add new sounds to the
sound file and hook them up to certain softkeys. I was able to add a
Xing Signal Horn/Whistle (SXS) sound to an engine that did not come
with such
a sound. You can have the remote display the softkey label also.
Two new options on the [Edit
Clip] window : "(o)
Add a clip from
another
sound file into an empty index location" and "(o) Add a clip read from
a
file into an empty index location" let you put a new sound
into an
empty or unused index location. Use the first new option to copy a clip
from another sound file and use the second new option to copy an IMA 4
bit ADPCM clip or a 24 bit big-endian PCM clip (also known as raw audio
data) into your sound file.
How is this new feature useful? The remote has a few Softkeys
that aren't used much. For example:
SXS Xing
Signal
Older engines do not have this
sound
Sound Index 42
CDO Coors
Door
Open Only
one engine uses this
sound
Sound
Index 121
CDC Coors
Door
Close Only
one engine uses this
sound
Sound
index 122
SAH
Alternate
Horn
Used by the newest engines with quillable whistle
Sound index 243
I know where in the sound file that these softkeys are encoded. If the
right bits are set, the remote will display the softkey name.
I started with the sound file for the 20-3163 P&LE 2-8-0 H9
Consolidation (PS2). The whistle on this engine is not to my liking. I
took
the whistle and bell from the 20-3372 NYC Mohawk
4-8-2 (PS2) and
copied them into the H9's sound file. The sounds on both of these
engines are 4 bit ADPCM.
| Index |
Description of sound in the H9 |
Clip copied from the Mohawk |
Description of sound in the Mohawk |
Clip Size in Bytes |
| 41 |
empty |
41 |
1x toot |
4418 |
| 42 |
1x toot |
255 |
Xing Signal |
52158 |
| 43 |
2x toot |
43 (2x toot) |
2x toot |
7429 |
| 44 |
3x toot |
44 |
3x toot |
7555 |
| 121 |
Coors Door Open |
* |
|
- |
| 122 |
Coors Door Close |
* |
|
- |
| 152 |
Whistle |
152 |
Whistle |
4933 |
| 153 |
Whistle Ending 1 |
153 |
Whistle Ending 1 |
5218 |
| 154 |
Whistle Ending 2 |
154 |
Whistle Ending 2 |
16484 |
| 155 |
Whistle Ending 3 |
155 |
Whistle Ending 3 |
6466 |
| G171_P_484_GS4_49_LG-LTR_SP190319aU4X_142_11025_le_6db.raw156 |
Whistle Ending 4 |
156 |
Whistle Ending 4 |
11669 |
| 157 |
Bell |
157 |
Bell |
11616 |
| 243 |
empty |
41 |
1x toot |
4418 |
* I copied test sounds into these 2 locations just to test the progam.
I haven't yet decided what "real" sounds I want in these 2 spots in my
H9. You can choose whatever sounds you want in these locations. You
don't have to have slamming doors or gurgling beer - when you press the
CDO/CDC softkeys
on the remote, the engine will just play the sound.
To enable the softkey labels on the remote, I added three check boxes
on the [Edit Clip]
window:
[
] Set SXS Softkey (n42)
[
] Set SAH Softkey
(n243)
[
] Set
CDO/CDC Softkeys (n121/n122)
If you check the boxes you need, ADPCM will set the bits in the sound
file that will cause the remote to display those softkeys. You must
delete the engine from the remote and then add it back for the new
softkeys to appear. Note: this
is not working with the SAH softkey. I don't know why yet.
I've modified RTC
also to show buttons so you will be able to play these sounds as
follows:
SXS
No modification needed, this was already
supported
on the Operations window.
SAH
If the engine supports SAH, a new button
[Alternate
Sound] will appear under the horn/whistle button on the
RTC Operations
window - this will be available with version 3.22.0 of RTC.
CDO/CDC No modifications
needed, this was
already supported on the Sound window.
You can use any empty index location for new sounds (as long as you
don't exceed the size of the EEPROM in the engine). But you will have
to use the RTC program to access that sounds as there is no way to get
to them via the remote. This is a perfect use for the Hot Buttons
window in
RTC. You can have RTC send any 'nXXX' command at the press of a button.
So just edit up your sound file and load it into an engine for some new
sounds. Be sure to delete the engine from the remote and add it back
for the changed softkeys labels to take effect.
v 1.3.1 Editing Softkeys
Version 1.3.1 adds the ability to edit the softkey settings. That is,
the bits in the sound file that tell the remote which softkeys to
display. Most useful if you plug a light into a prevously unused jack
on the PS2/3 board in the engine. You can set the bit and the remote
will present you with a softkey. Also useful when there are errors in
the original sound file from MTH (there are a few!). For example, one
engine I have does
not have marker lights but the LMK softkey appears on the remote. With
this editing function, you can can remove that softkey.
To use this, select a sound file on the main window, press [Analyze]
and press [Edit Softkeys].
The program will show you the current status
of which bits are set. You can select or deselect softkeys.
Press
[DoIt] or [Cancel] when
complete. Then download the sound file to the
engine, delete the engine from the remote and add it back for the
change to take effect.
The remote seems to have used odd terminalogy for the connectors on the
board. They talk about "on
Ditch", "on
Interior" and "on
Mars" to mean three connectors on the board. Then when
they say "Mars Light on
Ditch" they mean the Mars light plugged into the Ditch
connector. You can see each light listed like that on the table on pg
121 of the 5th edition DCS Operators Manual.
v 1.3.2 Cleanup and minor enhancements
1. Added a few more softkeys that can be turned on or off on the "Edit
Softkey" window.
2. Added the ability to delete a clip from the sound file. The released
memory becomes available to be used by added or replaced clips. From
the [Edit Clip]
menu, select "(o) Delete
clip, clear index location and recover space in the sound file".
If you just want to clear the index without deleting the clip, select
"Clear this index" from the index popup menu.
3. When you press the [Analyze]
button, the progam will display the
available time remaining in the sound file for added/replaced clips.
The calculation is based on the setting of the Format and Sample Rate
radio buttons. If you want the time remaining for a different Format or
Sample Rate, press the radio buttons as wanted, right click to get the
main ADPCM popup menu and select "Available Time Remaining".
4. Added selections to the index ADPCM popup menu to clear an index
location and to copy an index location to another index location.
v 1.3.4 Replacing a sound with silence and other minor
enhancements
1. Added the sample rate into the automatically generated filename when
"Dump Clip to Disk" menu item is selected.
2. Changed the "Dump Clip to Disk" menu item to have a submenu that
lets you dump the entire clip as it originally did or to just dump the
repeating segment. NOTE that dumping the repeating segment of a 4bit
ADPCM clip may not be useful because the State Machine Initialization
has not been taken into account.
G171_P_484_GS4_49_LG-LTR_SP190319aU4X_142_11025_le_6db.raw
3. When you export to mp3 & 16 bit raw formats, the 16 bit
little-endian PCM raw data is saved in a file named <sound
file>_<clip
number>_16bit_little_endian_PCM_<sample
rate>.raw. This file can be easily imported into Audacity:
Select Import -- Raw Data
Pick the .raw file created by ADPCM
Select Encoding: Signed 16 bit PCM
Select Byte order: Little-endian
Select Channels: 1
Select Sample rate: 5512.5/11025/22050 as
necessary
Press [Import]
4. I found that the "Exporting one clip to mp3" function was used more
than "Export All Clips to mp3". The [Export
mp3] button on the main
window now does the first function. You can access the second function
from the index popup menu.
5. If you hold down the shift key when you click on [Export mp3], ADPCM
will use the long play method which will export the clip including the
number of repeats in the "Rep" field. In the case of the horn/whistle,
the export will contain one of the four different horn/whistle endings.
6. Added the option to the Edit Clip window to replace a sound with
silence. The program does not just delete the sound but replaces it
with 0.01 seconds of silence. If there was a repeating segment, the
silent clip will also contain one. I can't be certain that this scheme
will always work - send feedback. This was suggested by a member of the
OGR
Forum. The freed up space in the sound file becomes available for new
or replacement sounds. Press [Edit Clip] then select "(o) Replace clip with silence and
recover space in sound file".
7. More minor bug fixes.
V1.3.5 Misc Cleanup
1. Made "[X] Automatic
Settings" default to checked. The program has
actually gotten pretty good at this guess. You can always override the
program by picking Level/Format/Rate explicitly using the radio buttons.
2. Fixed an incorrect error message when using [Edit Index] to
change
the data byte from 24 bit PCM to 4 bit ADPCM setting in PS3 sound files
that were less than 2MB in size.
3. The Hex Editor code that I used in the [Edit Index] window,
written
by Jacek Szumigaj <szumi users.sourceforge.net>
was not working
quite right. I tried to repair it and now it functions a little better.
users.sourceforge.net>
was not working
quite right. I tried to repair it and now it functions a little better.
V1.3.6 Copying Quillable Whistle Sounds
1. With the help of user rayman, we discovered the Quilling data that
needs to be copied with the Quilling clip. This appears to be Quilling
data in the Sound file from offset 0x3200 to 0x3EFF. This block of data
is all 0xFF in PS2 sound files and all 0x00 in most PS3 sound files. In
PS3 sound files with Quillable Whistle, there appears to be "real" data
in this block.
I added a check box "[X]
Quillable Whistle" to the Edit Clip window.
This check box is enabled when you are replacing a clip from another
sound file or when you are adding a clip from another sound file into
an empty location.
Note that it appears that the Quillable clips are all contained in
clip 3 in the sound
file though I don't know if that is always the case.
If you check the check box, then when you press [Do It] to
replace/add
a clip, the necessary Quilling data is copied to the sound file along
with the new clip. This will work for any clip number just in case the
Quillable clips are at something other than clip 3. This operation is a
copy of exactly 0xD00 bytes so the sound file neither grows nor shrinks
as a result of copying this data.
Note:
v1.3.6 was not the complete story to copying the Quillable
Whistle. Version 1.4.0 and later have a better implementation.
V1.4.0 Playing
Quillable Whistle sub-clips and Inserting a Quillable Whistle in a
PS3.0 sound file
that did not previously have one
1. I added a new screen to let you play the sub-clips of the quillable
whistle. The quillable whistle, usually clip 3, is a set of
short
clips that the engine plays in different sequences in response to the
thumbwheel movement. To play each of these sub-clips, load and analyze
a sound file, select
clip 3, and press the [Quill]
button. Then press [Analyze]
on the
Quilling Whistle Index window. ADPCM will display all of the sub-clips.
You can double click on any one to play it. There can be up to 208
sub-clips.
2. I've figured out how to add Quilling Whistle to PS3 engines which do
not have that feature. It involves copying the whistle from an engine
with that feature into your sound file. I have done this with the:
30-1660-1 P&LE (NYC) 0-6-0 USRA Steam Switcher #9060 PS3.0
using the whistle sounds from the:
20-3677-1 O Scale Premier 4-8-4 Greenbrier Steam Engine PS3.0
You should replace all of the whistle clips with the replacment clips
otherwise you will have different sounding whistles in the
engine. But that is up to you.
Open ADPCM with the sound file that you want to add the quilling
whistle.
Press [Analyze].
Edit the following clips and replace the sounds with the corresponding
sounds from the replacment engine:
41
42
43
44
152
153
154
155
156
Edit the softkeys and check the [X]
Proto Whistle SPW box.
Now add clip 3 (the quilling whistle) from the Greenbrier into the
empty clip 3 index position. Check the [X] Quilling Whistle
check box
before you press [DoIt].
I don't know for sure, but apparently, the quilling whistle has to be
in
clip 3. If clip 3 is not empty, this procedure probably won't work.
Download the sound file into your engine. Delete the engine from the
remote and Add it again. This will make the remote show the SPW softkey.
Information Only - for those of you with some programming background,
here is the problem with the Quillable whistle - the quilling data uses
HARD CODED sound file addresses. It should have used relative address
from the start of the clip, using the address in the clip index as a
base. This means that if sound clip 3 gets moved from its
original
starting address, the HARD CODED addresses in the quilling data must be
adjusted. This is what I added in v1.4.0.
3. Now that we can work with quillable whistles, I've added support for
it in my RTC (Remote Train Control) program. Look here for the latest
version: http://www.silogic.com/trains/RTC_Running.html
4. The Data byte is displayed in color according to this table:
Sound Category
24 bit
PCM
4 bit ADPCM
Engine Sound
Fuchsia
Black
Accent Sound
Sky Blue
Aqua
Horn/Whistle Sound
Red
Maroon
Bell Sound
Green
Lime
Remember that the sound category corresponds to the different volume
controls available in the engine.
V1.4.1 Change
to how Whistle/Horn ending sounds are played by ADPCM
- This functionality was changed from the previous version of ADPCM to
more closely align the operation of ADPCM with the operation of the
Remote:
- When you press [Play
Clip] for clip #152
(horn/whistle),
ADPCM will always play clip 153 as the ending of the
horn/whistle.
This will also occur if you press [Export
mp3].
- When you press [Long
Play] for clip 152, ADPCM
will play
the clip with the number of Repetitions set and then will play one of
these three clips as the ending: the program will randomly choose clip
154, 155 or 156. This will also occur if you press [Shift][Export mp3].
As Rob Adelman describes it in his book "Model
Railroading with MTH
Electric Trains" : "You can vary the whistle/horn by pressing
and
holding the W/H button for 3 seconds or more. Doing so will cause
different tone inflections in the ending of the whistle/horn sound
ending depending on how long you hold the button down, producing a
neat, varied effect."
V1.4.2 Bug
Fixes
- Clarification: the popup menu from the clip index has a menu item
"Minimize File Length". This is useful if you have uploaded a sound
file from an engine. The resultant uploaded file sizes are always an
integral
multiple of 1 MB (that is, 1MB, 2MB or 4MB). The actual
sounds
rarely take up the entire file size. This menu item will chop off the
unused ending of the file so that it will download into the engine much
faster. I should also add that you don't have to do this to add new
clips to the sound file. ADPCM automatically detects the filler at the
end of the file and moves new sounds over top of the filler.
- Fixed a problem that caused a crash when you edited a second clip
index during one session.
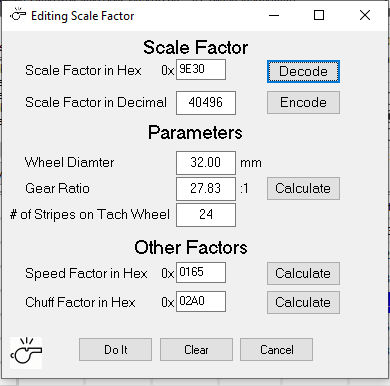
V1.5.4 Edit Scale/Speed/Chuff
1. I added the Engine Sound and Idle Sound softkey enables/disables to the Edit Softkeys screen.
2. Edit the Scale/Speed/Chuff Factors - Main Menu item "Edit the Scale Factor". Click here for more details about this operation.
The option is located in the main popup menu. Right click in a
background area of the main screen. You could try just to left or just
to the right of the [
Exit] button. Then select "Edit the Scale Factor".
When you click on this, a new window
will popup. It shows the scale factor, speed factor and chuff factor, in
hex, taken from the sound file.
Click on [
Decode] next to scale factor and the decimal value will
display. Also, clicking on [
Decode] when you have 2 of the 3 parameters
filled in, ADPCM will calculate the third.
If you have the 3 parameters, enter them and then press [
Encode]. The
program will calculate the scale factor in hex and decimal.
If you have the scale factor in decimal, click on [
Encode] next to scale factor to show the hex value.
If you have the 3 parameters, you can press [
Calculate] next to either
speed factor or chuff factor and the program will calculate those
values. The chuff factor is calculated to 4 chuffs per wheel
revolution. If you want 2 chuffs per rev, multiply the calcuated value
by 2. Chuff factor is zero for diesel engines.
You can also enter the values manually.
Click on [
Do It] to write the new scale factor, speed factor and chuff factor to the sound file.
I have tried this on a couple of engines and I can't get it to have a
significant effect. Another user has tried it on his engines he says it
does its thing. I'd be interested in hearing your experiences.
3. Copy & truncate sound file for faster downloading.
This writes out a truncated (32K) sound
file. Its the first 32K of the sound file. It contains all of the
information in the sound file except the sounds themselves. Since the
Scale Factors, clips index, quill index and soft key definitions are in
this 32K, its a much smaller file to download.
I tried it with the MTH DCS loader and the loader seems to handle the
short file with only one problem. The truncated files is loaded
correctly but the first bytes of the first clips are zeroed out. This
means you can use the truncated file for testing but once you determine
values for the factors, you should download the entire modified sound
file.
Filename is the sound file name with _0x8000 appended.
4. Edit the PCM Clip Volume
This is an experimental function that
lets your change the volume level of a 24 bit PCM clip. When prompted,
enter a multiplication factor. "1.0" means no change. Smaller values
reduce the volume, larger values increase the volume level.
When you use this, you could increase the volume over the maximum
allowed value. This will, in effect, "peg" the meter at maximum. When
you play the clip with ADPCM, the program will display the Dynamic
Range in the "Messages" window. If that range shows that you hit 100%,
then you have probably increased the volume too much. If this happens,
toss out the edited sound file and try again. (Once the volume goes
over 100%, information is lost and the sound file is no longer usable.)
V1.5.5 Bug in menu item
1. Fix a bug in the "Dump this clip to disk ->
Dump entire clip to disk" function from the right click index popup
menu. It did not create the .raw/.ima file but rather, got an error
V1.5.8 Bug in menu item (Click on version number to download - includes source code)
1. Repaired an error that would cause some 4 bit ADPCM clips to play incorrectly.
2. Added a [Clear] button to the Editing Scale
Factor window so you can reset all values and try a different solution.
3. "Replace clip with silence and recover space" did
not work correctly (thanks to Brendan D. for discovering this problem).
V1.6.1 Engine Parameters (Click on version number to download - includes source code)
1. Added the Engine Parameters window, a new way to
think about the Scale Factor. Look below for more information.
V1.6.2 Engine Parameters (Click on version number to download - includes source code)
1. I injected an error in the Edit the Clip window. The
Data Byte no longer automatically changed when you clicked on one of
the 4 settings selections. Fixed. Thanks to Brendan for pointing this
out.
V1.6.3 Copying a 24 Bit PCM clip over a shorter PCM clip (Click on version number to download - includes source code)
1. Another bug found by Brendan. Occurs only if you replace a 24 bit PCM clip with a a shorter PCM clip.
V1.6.4  Playing of certain clips (Click on version number to download - includes source code)
1. Certain clips would not play correctly if they
had a wide dynamic range. The clips would play "clicking" sounds.
After you download the ADPCM program, follow the installation instructions above.
--- A reminder to always
work with a
copy of your sound file. ADPCM makes changes/edits to the sound file
immediately without
confirmation. --- But if you do accidently change it, you can always download a fresh copy from the MTH web site.
Exporting 4 bit IMA-ADPCM clips into Audacity for Editing
If you want to edit a 4 bit IMA-ADPCM clip from a sound file using
Audacity here is one way to do it:
1. Using ADPCM, click on the sound index you want to use, right click
for the popup menu and select "Dump this clip to disk" -> "Dump
Entire Clip to Disk". This will
create a "*.ima" file on disk. The name of the file will be the sound
file name followed by the clip number. This file is in IMA-ADPCM format.
2. Audacity cannot import this directly. I use sox
to convert it to a VOX-ADPCM file with this command line:
"C:\Program Files (x86)\sox-14-4-2\sox" infile.ima -e
oki-adpcm -c 1 outfile.vox
The program zip file has a batch file
named ima_to_vox.bat
which may help you with this conversion. Here is a listing of that
batch file:
Here is a listing of that
batch file:
@echo off

if "%~1"=="" (goto error)
Set filename="%~1"
echo.Filename is: %filename%

Set Folder="%~dp1"
echo.Folder is: %Folder%
Set Name="%~nx1"
echo.Name is: %Name%

rem Check that the extension is .ima
set Ext="%Name:~-4,-1%"
echo %Ext%
if not %Ext%=="ima" (goto exterror)

rem Strip the extension and replace it for Outname
set Outname="%Name:~1,-5%.vox"

echo.Outname is: %Outname%
rem echo.Current Folder is:
rem
cd /d %Folder%
rem

echo "C:\Program Files (x86)\sox-14-4-2\sox" %Name% -e oki-adpcm -c 1 %Outname%
"C:\Program Files (x86)\sox-14-4-2\sox" %Name% -e oki-adpcm -c 1 %Outname%
rem
echo Import this file into Audacity as VOX-ADPCM
echo Select Import -- Raw Data
echo Pick the .vox file created by this batch file
echo Select Encoding: VOX-ADPCM
echo Select Byte order: Big-Endian
echo Select Channels: 1
echo Select Sample rate: 5512.5/11025/22050 as necessary
echo Press [Import]
rem
pause
goto end
rem
:exterror
Echo You can only use *.ima files
pause
goto end
:error
Echo You did not enter the input file name.
pause
:end
|
3. Then import this file into Audacity as VOX-ADPCM. In Audacity:
Select Import->Raw Data
Pick the
".vox" file created by the above sox command
Select
Encoding: VOX-ADPCM
Select
Byte order: Big-Endian
Select
Channels: 1
Select
Sample rate: 5512.5/11025/22050 as necessary
Press [Import]
4. You can edit the sound as necessary and then export it and
prepare it for use by ADPCM. Follow the instructions above in the
section "Replacing a clip with clip from another file"
You can also access
these videos on my YouTube
Channel.
ADPCM Video 1 -
Example of a PS2 sound file
Video recorded 29 Aug 2016
Image loading....
P&LE U28B Sound File (PS2)
ADPCM Video 2 -
Example of a PS3 sound file
Video recorded 29 Aug 2016
Image loading....
P&LE GP-7 Sound File (PS3)
ADPCM Video 3 -
Demo of the various whistle clips in a sound file
Video recorded 22 Apr 2017
Image loading....
20-3677-1
C&O 4-8-4
Greenbrier Steam Engine (PS3)
ADPCM Video 4 -
Crossing Sound SXS added to a PS2 engine that did not originally have
one
Video recorded 24 Apr 2017
Adding a SXS Crossing sound into a PS2 engine that did not
originally have one. I am using 20-3232-1 as my example. Uses my ADCPM
program and Audacity.
Image loading....
20-3232-1 0-8-0 USRA - Aliquippa
& Southern #211 (PS2)
ADPCM Video 5 -
Proto (or Quilling) Whistle SPW added to a PS3 engine that did not
orginally have one
Video recorded 24 Apr 2017
Adding a Quillable Whistle (Proto Whistle) sound into a PS3 engine that
did not originally have one. I am using 30-1660-1 as my example. Uses
my ADCPM program and Audacity.
Image loading....
30-1660-1 P&LE (NYC)
0-6-0 USRA Steam Switcher #9060 (PS3)
ADPCM Video 6 - In my
train room - operating the Proto (or Quilling) whistle SPW with my RTC
program
Video recorded 23 Apr 2017.
Image loading....
30-1660-1 P&LE (NYC)
0-6-0 USRA Steam Switcher #9060 (PS3)
Sorry about all the shaking in the video, I was holding my phone in one
hand while pressing buttons on the screen with the other. In this
video, I keep on referring to this
engine as an 0-8-0. It's really a 0-6-0. Brain cells dying off.......
Short Toots
No, this is not something we brass hats do. Its something that most PS2
and PS3 engines can't do.
Did you ever notice that no matter how quickly you press and release
the horn button on the remote or with RTC, there is a minimum
length of time that the horn blows? So, for example, it is
almost impossible to sound a crossing signal sound manually that
actually sounds
like a real version would sound. That is because the shortest toot can
you can blow is about 1.5 to 2 seconds long. Follow along my example
using the 20-20484-1 GP38-2 Diesel Engine #2060.
Look at this Audacity screen - in particular, the first
two tracks:
The first track is clip 152 and the second track is
clip 153.
I used the ADPCM program to dump out the clips to files and then I
imported them into Audacity. Recall that the horn consists of a
primary clip at 152 followed by 4 endings (clips 153 to 156).
When
you press the horn button on the remote, the engine starts
playing clip 152. As soon as you release the button, the engine
completes playing 152 and then plays 153. (It happens differently if
you hold the button down for a longer time.)
Clip 152 is 0.87 seconds long and clip 153 is 0.89
seconds
long. Total is 1.76 seconds - this is the shortest toot you can
manually get
from the engine.
I wanted a much shorter toot and I got it using Audacity to create the
clip and ADPCM to insert the new toot into the sound file.
I used Audacity to create new tracks by cutting & pasting parts
of
the original 152 and 153 clips. The third track is the first 0.20
seconds of the original 152 clip. The fourth track is about 0.10
seconds cut out of the middle of the 152 clip. This chunk is what I
call the repeating segment - the part of the clip that repeats over and
over if you hold down the button for a longer time.
The fifth track is track 3 followed by track 4. This will
become
the new clip 152 in the sound file. I exported this track to a file,
converted it from little-endian to big-endian and then used ADPCM to
replace the old clip 152. This clip is about 0.30 seconds long.
Next for the new clip 153, look at the following Audacity screen:
The first track is clip 153 as dumped by the ADPCM program. The second
track is the first 0.49 seconds of the original 153. Yes, I know, I cut
off some of the decay of the toot but when I played it, I still sounded
fine to me.
This will become the new clip 153. I exported this clip to a
file,
converted it from little-endian to big-endian and then used ADPCM to
replace the old clip 153.
So the shortest toot possible now is the 0.30 seconds from the new clip
152 and the 0.49 seconds from the new 153 - for a short toot of 0.79
seconds. About half of the original.
Here is the ADPCM screen after I inserted these two new clips into the
sound file:
In the screen above, clips 152 and 153 are the two new (shorter) toot
clips.
A few words about the End Rep and Start Rep fields. When you hold down
the horn button, the engine will repeat the Repeating Segment over and
over untill you release the button. The Start Rep and End Rep fields
define this part of the clip. When you replace the 152 clip, you must
specify these two fields. You have to figure out the values for these
fields that make the horn sound the best. I'm not sure that I did the
best job possible here but the new horn sounds pretty good. For my
particular case, with clip 152 loading at Start Address of 0x17AF57, I
used 0x17D5C1 (+983410), for the End Rep Address
and 0x19C93D (+663010) for
the Start Rep Address. If you edit up your own short toots, your values
will be different.
I used the DCS Loader to load this sound file into my engine.
ADPCM Video 7
- Short toot demonstration
Video recorded 6 Mar 2018.
Image loading....
The new Short Toot horn on my
layout with the P&LE GP38-2 #2060
and
Shave and Haircut riff
.
Shave and Haircut
At the same time that I put in the shorter toot, I wanted to use part
of clip 154 as a separate sound. Clip 154 is a long horn ending that
plays the recognizable riff - "Shave
and a haircut, two bits."
In the screen shot below, the top track is clip 154 as
exported
from the sound file by the ADPCM program. The first part of the track
is the ending sound for the long horn sound generated by clip 152. I
took that track and, using Audacity, I clipped off that ending sound at
the beginning of the track. I
exported this track to a file,
converted it from little-endian to big-endian and then used ADPCM to
replace the old clip 179. This clip is about 5.40 seconds long.
Why 179? The S01-S10 softkeys on the remote cause the engine to play
the clips stored at indexes 177-186 in the sound file. Once this new
sound file was installed in the engine, I could press the S03 softkey
and the engine will get its shave and haircut.
Here is the ADPCM screen after I successfully loaded in the new clip
179. The "Data" field is "A3" which associates this clip with the
horn/whistle. That means if you adjust the horn/whistle volume, this
clip will follow that adjustment. You can see in the "Messages" window,
this new 179 clip is 4.69 seconds long.
Video 7 on this page includes a demo of what this horn sounds like.
ADPCM
Video 8
- Under Construction
Video recorded ---.
Image loading....
----
Scale Factor, Speed Factor and Chuff Factor
NOTE: Read this section but look at the next section also. It has a different take on the same issue.
Over the years, a lot of people have asked: My engine runs
faster/slower than other engines at the same Smph setting. Is there
something that will change the wheel revolutions per second for a given
Smph?
This would really be easy if we knew the RAM locations for this
information and what the values mean. We don't -- but we can guess. We
were pretty sure that the low bytes of RAM contained some interesting
stuff!
I learned how to dump out the RAM memory in the engine by studying the
DTO/DOD/DCH commands. These commands return the values in particular
locations of RAM. Once I figured that out, I could dump out any memory
location.
I have been able to partially figure out the RAM
memory in each engine. This was all done by sending commands to the
TIU and examining the responses. As I had stated before and as
appears on my web pages: “I figured this out just by looking at
the RS-232 stream over the radio. No code disassembly,
no logic analyzers, no opening up of Remotes or TIU's.”
Eric Linz gave me some ideas when it came to decoding the responses
from the DOD, DCH and DTO commands using the Scale Factor. Ray Manley helped with understanding the Speed Factor and Chuff Factor. Keep in mind that what I am telling you may be totally incorrect.
As
I saw when working on the Sound File with my ADPCM program,
multi-byte data in the RAM is stored big-endian This
means that in multi-byte data, the lowest address contains the most
significant byte of the data.
You can download my documentation for this mapping here - Engine RAM Mapping.pdf.
This document describes the 'q' or query command which is used to access the RAM - QUERY
command uses.rtf.
If you are going to try changing these factors, you should do a few
things first. Remove the shell from the engine then 1) Count the number
of stripes on the tach wheel and 2) twirl the tach wheel and count the
number of revolutions to make the driver wheels go around once - this
the gear ratio.
Wheel Diameter
The wheel diameter is needed for these calculations. The traction tire
sizes used can tell us a little about the diameter. We can also measure
the actual wheel.
There is a chart on-line
(its pretty old - Dec 2013) that shows the traction tire sizes
available. Here is a summary of the O scale values for wheel diameter
(actual tire diameter is different):
| DE-0000014 |
17mm |
| DE-0000015 |
18mm |
| DE-0000018 |
22mm |
| DE-0000023 |
27-30mm |
| DE-0000025 |
32-33mm |
| DE-0000027 |
35-37mm |
| DE-0000031 |
38.5-42mm |
| DE-0000036 |
not given |
| DE-0000041 |
not given |
The chart on-line also shows wheel diameters for HO, Standard and #1 scale.
Almost "all" diesels have a 22mm wheel. I measured a bunch of these.
Hint: measure the wheel that does not have the traction tire.
Its hard for me to get a consistent value. When I measure the wheel
with the traction tire, I get
anywhere from 22.54mm to 23.01mm. Most larger wheel diameters are steam
engines. Tip: if you don't know and can't guess the wheel diameter for
your engine, call MTH and ask them which traction tire is used on your
model. Then lookup the wheel diameter in the chart.
Stripes on the Tach Strip
It appears that all engines use 24 stripes on the tach strip. The tach
wheels are different diameters but tach strips come in different
lengths so that when applied to the tach wheel, 24 stripes are present.
I have never seen anything other than 24 but your mileage might vary.
Gear Ratio
I actually twirled the tach wheel on several engines and counted how
many revolutions were required to make the drive wheel go around once.
I
counted 10.50:1 for diesels and 18:1 for steam engines. I don't
know if this is standard so you should count them yourself. I've
read on the OGR Forum, that the RK 2-8-0 has a 28:1 ratio and that some
Premier steam engines use 16:1 as well as 18:1.
Scale Factor (RAM 0x08 - 0x09)
The first discovery was that the DTO and DOD commands used the value in
RAM 0x08 and 0x09 as part of their calculations. Different engines had
different values here and I started calling it the Scale Factor. By
looking at different engines, I derived the following equations and
added these defines to my code. What I call DTOFACTOR was derived by
trial and error. That is, what value did I need to have my RTC
program's DTO and DOD values match the Remote. "Raw Value" is the value
returned by the engine. "Smiles" are scale miles.
/*
DTO (Display Trip Odometer in Smiles)
11 Sep 2019
Engine RTC Remote
1
0.25967
0.3 U28B
4
0.88183
0.9 SW1200
4 1.73594 1.7
5
1.11786
1.1 2-8-0 H9
6
0.40387
0.4 Berkshire
6 1.09274 1.1
11
0.25700 0.3
0-6-0
11 0.51748 0.5
13
1.55870 1.6
GP7
13 2.08773 2.1
14
2.19460 2.2
GP38-2
*/
#define DTOFACTOR (110.0/10.0)
#define DTOEQUATION(RawValue, ScaleFactor) ((RawValue) / ((ScaleFactor) * (DTOFACTOR)))
/*
DOD (Display Odometer in Smiles)
16 Sep 2019
Engine RTC Remote
1
648.10
647.5 U28B
2 532.02 531.5
4
298.34
298.2 SW1200
5
163.58
163.4 2-8-0 H9
6
161.26
161.1 Berkshire
11
291.32
291.0 0-6-0
13
102.70
102.6 GP7
14
61.76 61.7 GP38-2
*/
// This works well. In the actual code, I used a 9 bit left shift
// instead of multiplying by 512. And instead of 11.0, I used DTOFACTOR.
#define DODEQUATION(RawValue, ScaleFactor) (((RawValue) << 9) / ((ScaleFactor) * (DTOFACTOR)))
|
I believe that bytes 0x08 and 0x09 are a scale factor for the DTO and DOD commands.
Will this value also change the motor revolutions per second to be an
actual speed scaling? I assumed that since the scale factor value at
locations 0x08 and 0x09 was used by the remote to decode the DOD
and DTO values, that the same scale factor would be used by the engine
to encode the DOD and DTO (giving a Smiles value and in turn used to
compute the speed in Smiles/hour).
Apparently not so.
I verified that the Remote displays a very different value of DOD
depending on the value in locations 0x08 and 0x09 but the actual speed
over the track did not change.
Here is the equation that I derived to calculate the Scale Factor:
Inputs to the equation are:
- WD - The wheel diameter in mm
- GR - The gear ratio (typically 10.50 for diesels and 18.00 for steam engines - but might be different)
- NS - The number of stripes on the tach wheel (typically 24 - but might be different)
It uses these fixed parameters:
- 5280 feet/mile
- 12 inches/foot
- 48 (O Scale)
- 25.4 mm/inch
- M_PI = 3.14159265358979323846264338327950288
- "Smile" is a scale mile - 110 feet in O Scale - or 110 feet/Smile.
Here is my code directly from my C program:
K = (12 * 5280/48); // 1320 inches/Smile
// multiplier of 2 in the next equation seems to be because both the
// leading edge and the trailing edge of each stripe generates a count
TS = 2 * ((K)/((WD / 25.4) * M_PI)) * NS * GR;
// The meaning of the divisor of 11 in the next equation is DTOFACTOR. Test runs over
// measured distance show that it is exactly needed to generate
// correct distance reporting by the engine. Three ways to write the final equation:
SF = TS / 11;
SF = TS / DTOFACTOR;
SF = TS / 110 / 10;
SF = TS * 10 / 110;
This SF value is converted to hexadecimal and loaded into RAM at addresses 0x08 and 0x09 (big endian).
|
Getting the Scale Factor correct is necessary to be able to calculate correct values for the DTO and DOD commands.
So it appears that here is another data field that controls the engine speed.
Speed Factor (RAM 0x04 - 0x05)
I compared a bunch of sound files, looking at the first few hundred
bytes. I am assuming that the first bytes in the Sound file are loaded
into the RAM in each engine when the engine is powered on. I don't know
this for sure but when I look at RAM values, they seem the same as the
first bytes of the Sound file.
Bytes
0x04, 0x05, 0x64 and 0x65 are the only ones that were different.
Changes to bytes 0x64 and 0x65 seem to be random. The bytes at 0x04 and
0x05 have a pattern of some sort.
I was able to figure out a formula to calculate the value contained in 0x04-0x05.
I found it by seeing a pattern after looking at the values for about 10
engines. I can calculate the value to about 1% accuracy.
Ray Manley was helping me out testing this and he wrote:
Change has worked! Change with just 0x04-0x05 make changes to the speed.
In order to see the change
effect, shut the engine down and cut power to the track for a period of
time. I have been letting engine sit for 45 seconds.
Orig factory settings for a Triplex: (= ~450rpm of my test flywheel)
- Hex - 0x4EC2
- Decimal - 20162 (Calculated, not manually entered) so this field was
originally blank)
- Wheel diam - 50.00mm (manually entered)
- Gear Ratio - 21.65 (Calculated, not manually entered) so this field
was originally blank)
- Stripes - 24
- 0x04-0x05 = 0x01DD (Orig value)
Changed: (=~140rpm of my test flywheel)
- Hex - 0x4EC2 (Not changed)
- Decimal - 20162 ((Not changed) - Calculated, not manually entered) so
this field was originally blank)
- Wheel diam - 50.00mm (CHANGED manually)
- Gear Ratio - 21.65 (Not changed) (Calculated, not manually entered)
so this field was originally blank)
- Stripes - 24 (Not changed)
- 0x04-0x05 = 0x0589 (New calculated value)
SO, just changing the
0x04-0x05 value by itself using the calculation affected the
change. So you got it. I will do more experimentation to
see about doing changes to calibrate speeds exactly where I want them
on a new file. This was just to see if I could get it to
change.
Raymond |
Ray had more success with this RAM setting than I did.
Here is the equation that I dervied to calculate the Speed Factor:
Inputs to the equation are:
- WD - The wheel diameter in mm
- GR - The gear ratio (typically 10.50 for diesels and 18.00 for steam engines - but might be different)
- NS - The number of stripes on the tach wheel (typically 24 - but might be different)
It uses these fixed parameters:
- 5280 feet/mile
- 12 inches/foot
- 48 (O Scale)
- 25.4 mm/inch
- M_PI = 3.14159265358979323846264338327950288
- "Smile" is a scale mile - 110 feet in O Scale.
K = (12 * 5280/48); // 1320 inches/Smile
// multiplier of 2 in the next equation seems to be because both the
// leading edge and the trailing edge of each stripe generates a count
TS = 2 * (K/((WD / 25.4) * M_PI)) * NS * GR;
// the meaning of the divisor of 11 in the next equation is not known. Test runs over
// measured distance show that it is exactly needed to generate
// correct distance reporting by the engine.
// Calculate Scale Factor
SF = TS / 11;
//
// Calculate Speed Factor
// Constant was calculated by Gear Ratio Spreadsheet (if anyone wants this, let me know)
// 31.9288 ms/tick_of_DCH
SpdF = (4973087 * 31.9288) / (SF * 11);
This
SpdF value is converted to hexadecimal and loaded into RAM at addresses
0x04 and 0x05 (big endian). My equations match the value in the sound file to within 0.05 percent.
|
Chuff Factor (RAM 0x18 - 0x19)
After Ray helped with the Speed Factor, he wrote:
There is a second
configuration item that calibrates the number of chuffs per revolution
that we haven't identified. (prior files were diesels) So I
wanted to provide a steam file in case that could be identified.
The after file has the correct speed calibration as has 4 chuffs per
rev. Before file has incorrect speed (runs slow) and has 6 chuffs
per rev. And to confirm again, there is no question the
0x04-0x05 is the speed calibration for sure. It works perfectly.
Ray |
Ray did some more experimenting and he wrote:
0x18-0x19 = Adjusts the
chuff rate per revolution. This has allowed me to fully update a
new steam file to exactly match the speed and chuff specs of the
original file. This value appears to be 0000 for diesels
and likely not used.
Ray |
I set the chuff rate for a bunch of engines and dumped out the contents
of RAM 0x18-0x19. I can see the chuff rate value change. First, it
appears that the sound file has the chuff rate value for 4 chuffs/revolution. When
you change the rate, the value in 0x18-0x19 changes.
It was easy to see a pattern - multiply the 4 chuffs/revolution value by 4 to get
the 1 chuff/rev value. This is divided by 1 through 16 to get the various
rate values. Looking for a pattern, I can see that the 1 chuff/rev value is 2
times the number of tach stripes for one rev of the driving wheel.
So its an actual count of the tach stripes times 2. This is consistent with
the DOD value where it appears that both a black to white and white to
black change on the tach strip causes the tach count to increment.
Number of stripes for one rev of the driving wheel is simply equal to (gear_ratio * number_of_stripes_on_tach_strip).
Three of my four steam engines fit this exactly (example values I've
seen: 0xD8, 0x0C and 0xA8). The fourth is off by a factor of two - I
don't understand that - it was 0x1B0 where ADPCM calculated 0xD8.
Here is the equation that I dervied to calculate the Chuff Factor:
Inputs to the equation are:
- WD - The wheel diameter in mm
- GR - The gear ratio (typically 10.50 for diesels and 18.00 for steam engines - but might be different)
- NS - The number of stripes on the tach wheel (typically 24 - but might be different)
It uses these fixed parameters:
- 5280 feet/mile
- 12 inches/foot
- 48 (O Scale)
- 25.4 mm/inch
- M_PI = 3.14159265358979323846264338327950288
- "Smile" is a scale mile - 110 feet in O Scale.
// Number of stripes for one rev of driving
wheel * 2 = Number of DTO counts for one rev of driving wheel
// Number of stripes for one rev of driving wheel = gear_ratio * number of stripes on tach strip
// Divided by 4 to set 4 chuffs/revolution (use divisor depending on how many chuffs/rev you want)
CF = NS * GR * 2 / 4;
This CF value is converted to hexadecimal and loaded into RAM at addresses 0x18 and 0x19 (big endian).
|
Here is the spreadsheet that I
used to figure out the patterns for these values. Sorry that its not
very explainatory. This is, after all, guesses by me.
Here is a typical use for this feature (user's email in red, my comments in black):
Date sent: Wed, 23 Sep 2020 19:08:16 -0500
Subject: MTH PS2 Scale Factors & Chuff Rate?
Hello. I was recently using your ADPCM program to analyze and modify
MTH PS2 sound files and when I loaded a different different sound set
(from a Premier Berkshire) onto my Railking starter set 2-8-0, the
speed and chuff rate were wrong.
I copied the scale factors, speed factors, and chuff factors from the
old file to the new one and loaded the updated file, but still the
engine's chuff rate was off. I was going for 4 chuffs per revolution
but when set to that in DCS, the engine produced at least 8, if not
more. When set to 2, I was getting somewhere between 3 and 4 chuffs per
revolution but it was clearly not a whole number. I am wondering, what
needs to be set on the sound file to get the chuff sounds to play
correctly and for the speed to be correct? I am not sure of the wheel
ratio or gear ratio if those are needed.
Also, when I changed the speed factor, it seemed okay, but I did not
run it with another loco to verify. I guess what I'm also asking is for
an explanation as to how these values work and how to determine them
properly.
Let me know what you can. |
Thanks for the email. I
will try to figure out what is going on. I am still experimenting with
the speed and chuff factors. I, of course, don't know the real meaning
of these values as MTH has not published the info.
Can you send me the MTH stock numbers for the two engines that you
are working with. I will go to the MTH web site and download the sound
files. Then I will take a look at the values. |
| The number of the target engine and its original sound file is 30-4136-1 (Railking PRR 2-8-0) and the number for the engine I’m wanting to add the sound file from is 20-3291-1
(Premier NKP Berkshire). I also unchecked all of the light soft keys in
ADPCM since they are not used on the 2-8-0 if that’s worth noting. |
First, we need to know
the diameter of the driving wheels on the two engines. Measure as
accurately as you can. Measure at about the center of the flat of the
wheel as they touch the rail.
Do this in millimeters if you can, otherwise we can convert from inches. |
| I
measured several times on multiple wheels to be 100% sure. It appears
to be 32mm for the 2-8-0. I don’t own the Berkshire, I just want
to use its sound file on the 2-8-0. |
When I look at the Sound file for the 2-8-0 and enter a wheel diameter of 32mm and press [Decode], ADPCM tells me the gear ratio is 27.83:1. I would round this off to 28:1.
If I enter the gear ratio of 28:1, set the Wheel diameter to 00.00 and again press [Decode], ADPCM tells me the wheel diameter is 32.20mm.
I looked at the Scale Factor and Speed Factor in the original 2-8-0
sound file and those seem like good values to use in the NKP Berk
Sound file. That is, they are very close to the values that ADPCM
calculates when using a wheel diameter of 32mm and Gear ratio of 28:1.
If I put those two values into ADPCM and press [Calculate] in the
"Parameters" section, I get:
Then I let ADPCM calculate the Speed Factor and Chuff Factor by pressing their [Calculate] buttons:
The values calculated by ADPCM for Scale Factor and Speed Factor are
very close to the original values in the 2-8-0 sound file and any
variation caused by the slightly different values would probably not be
noticable.
The Chuff Factor calculated by ADPCM is very different from the value
in the original 2-8-0. When you tried this, did you use the 0x02A0
value from the 2-8-0 sound file? I would instead try 0x0150 or 0x00A8.
(Mark's added note: 0x02A0 divided by 2 is 0x0150 and divided by 4 is 0x00A8)
Is there any way you can take the shell off of the engine and manually
turn the Tach Wheel and count how many revolutions are required to get
the drivers to turn one revolution? A gear ratio of 28:1 seems wrong
(but not unheard of). I have a different 2-8-0 and it's gear ratio is
18:1 (20-3163-1 Premier 2-8-0 H9 Consolidation). |
| Just took the shell off the engine and it is in fact 28 revolutions to one driver revolution. |
OK, that does match with
the calculations done by ADPCM and your measured wheel diameter of
32mm. That means that the Scale factor and Speed factor from the 2-8-0
file can be inserted into the Berk file.
The Chuff factor will need some testing to see if 0x0150 or 0x00A8 will get the chuff right.
In 75% of the engines that I've seen, ADPCM calculates the Chuff factor
correctly (it did for the Berk = 0x00C0) but there is something else
going on in some engines where ADPCM is off by a factor of 2 or 4.
|
| The chuff was correct with 0x0150. |
| Have you compared the speed with another engine? |
| Yes I have and the speed is accurate. Thanks for your help. Really made this basic 2–8-0 sound much better! |
Now look at the next section for a different take on this issue.
Engine Parameters
My thinking about the previous section on Scale Factor has changed over the years.
I am still pretty sure that the lower 256 bytes of the sound file
contains engine performance parameters. I've created a new window,
called Engine Parameters, which lets you edit more of the engine
parameters. This was added to version 1.6.1 of ADPCM.
I am actively working on a description of this window. Right now it is in a separate document. You can download it here: Engine Parameters.pdf.
I used Embarcadero
C++ Builder v10.1 Berlin to compile the program.
I used Audacity
and WavePad
to try different decodes on the ".mth" file.
I used hex editor HxD
in understanding the format of the sound file and in editing the sound
file.
I used SOX
to understand and convert audio files from one format to another.
I use Lame
to convert clips to mp3 format.
Screen recording
performed with CamStudio
and with Icecream
Screen Recorder.
One of the users of my program, Brendan, used ADPCM to make up a Polar
Express sound file using the whistle and chuff from the movie:https://www.youtube.com/watch?v=bdJNwCJnYyw
This site prepared and maintained by Mark DiVecchio
email : markd@silogic.com
SD&A
HOME
Mark's Home Page
The DiVecchio
genealogy home page
The Frazzini
genealogy home page
This site will be under construction for a while.