Mark DiVecchio's O-Gauge Train Layouts
3D Printed
White Tower Restaurant
This Page last updated on
.
(For more 3D prints, click
here)
Designing
and Printing a 3D White Tower Restaurant
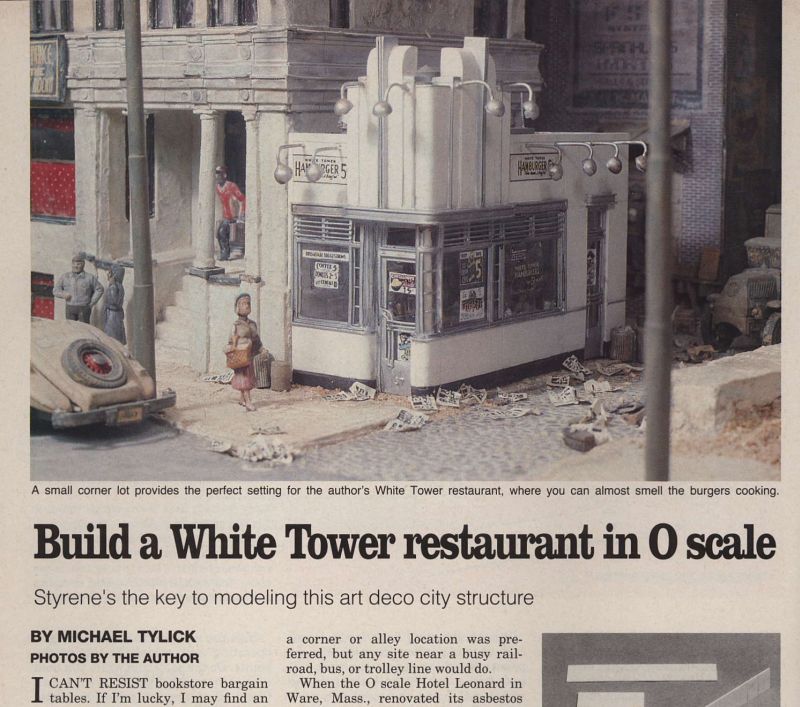
I've been carrying
around the White Tower Restaurant article from the March 1993 issue
of Model Railroader for just about 25 years. I was
captivated by
Michael Tylick’s
model from the first time I saw it but I did not
even come close to having the skills to construct it. So now I have
something to help me, 3D printing. Using the Autodesk
Fusion 360
program and the drawings in the article, I designed, printed, painted
and assembled a reasonable version of the White Tower restaurant for
my layout.
My
journey through
this project was really three journeys; selecting a 3D printer and
learning how to use it, finding a computer program to develop the
model, and finally, printing, painting and assembling the
model. Mike’s original model and my copy are O scale.
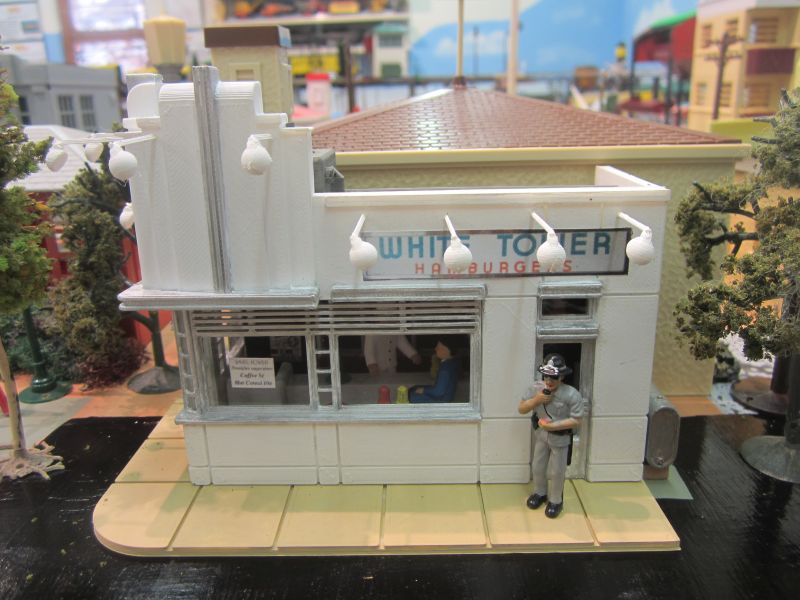
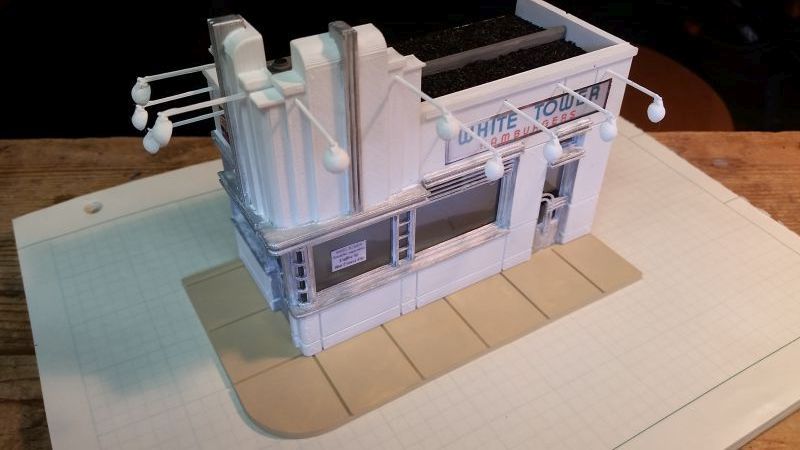
The
completed White Tower Restaurant
Finding a Printer
I’ve learned that 3D printers come in three sizes; cheap -
$150-$250, reasonable - $700-$1000 and expensive - $2000-??. It boils
down to how much tinkering you can (or want) to do. The cheap printers,
mostly on eBay, are kits from China. They work well enough but their
assembly and adjustment is difficult. The reasonably priced printers
are kits at the lower end and fully assembled at the upper end. More
thought has been put into the engineering of the printer. Assembly and
adjustment are easier than the cheap models. The expensive printers are
fully assembled, adjusted and tested. They work out of the box.
All will be able to print the White Tower Restaurant.
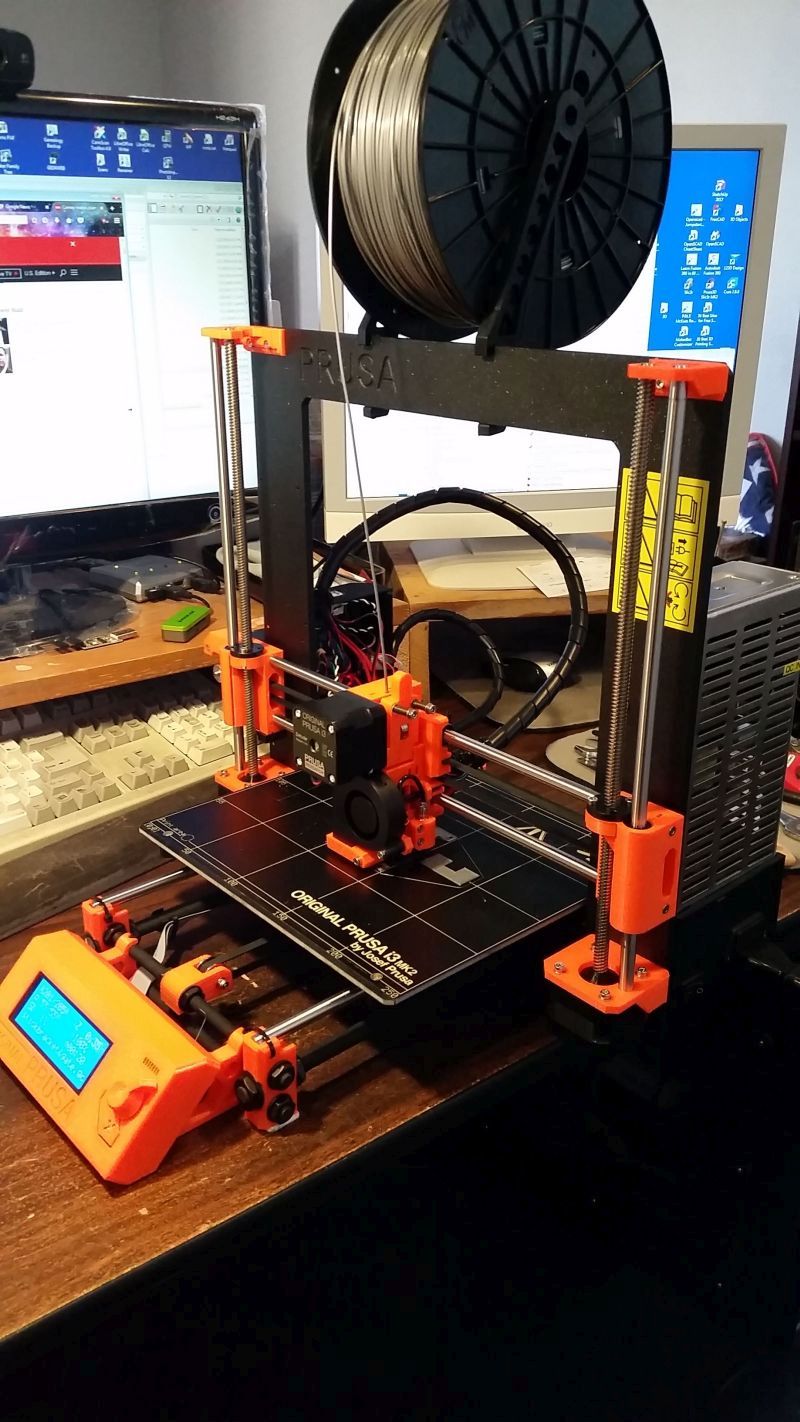
I selected a printer from Prusa Research. It was their model Original
Prusa i3 MK2S. It was a kit which I assembled and adjusted.
Anyone with the
mechanical and electrical skills to build a model train layout will be
able to successfully get this printer working.
3D printers can use many different types of material. I used a type of
plastic called PLA (Polylatic Acid). I was able to use plastic solvent
to assemble the model.
Here is a photo of my printer printing some small parts of a project I
used to learn how to use the printer.
My Original Prusa I3 MK2S
3D Printer
Finding a Program
There are many free programs available. FreeCAD, OpenSCAD, Tinkercad
and SketchUp are four. These programs are fine for simple structures. I
used them to construct small objects as I was learning how to use the
printer.
I used a fifth program to actually develop the model, Autodesk Fusion
360. This program is free for hobbyist users. It is a feature rich
program with every design function you will ever need. There certainly
was a learning curve involved. I learned the program as I developed the
model. When I got to a point where I needed to do something
and
didn’t know how to do it, I googled it or checked one of the
hundreds of tutorials on YouTube.

Starting on the front wall using Fusion 360

Front and side walls completed
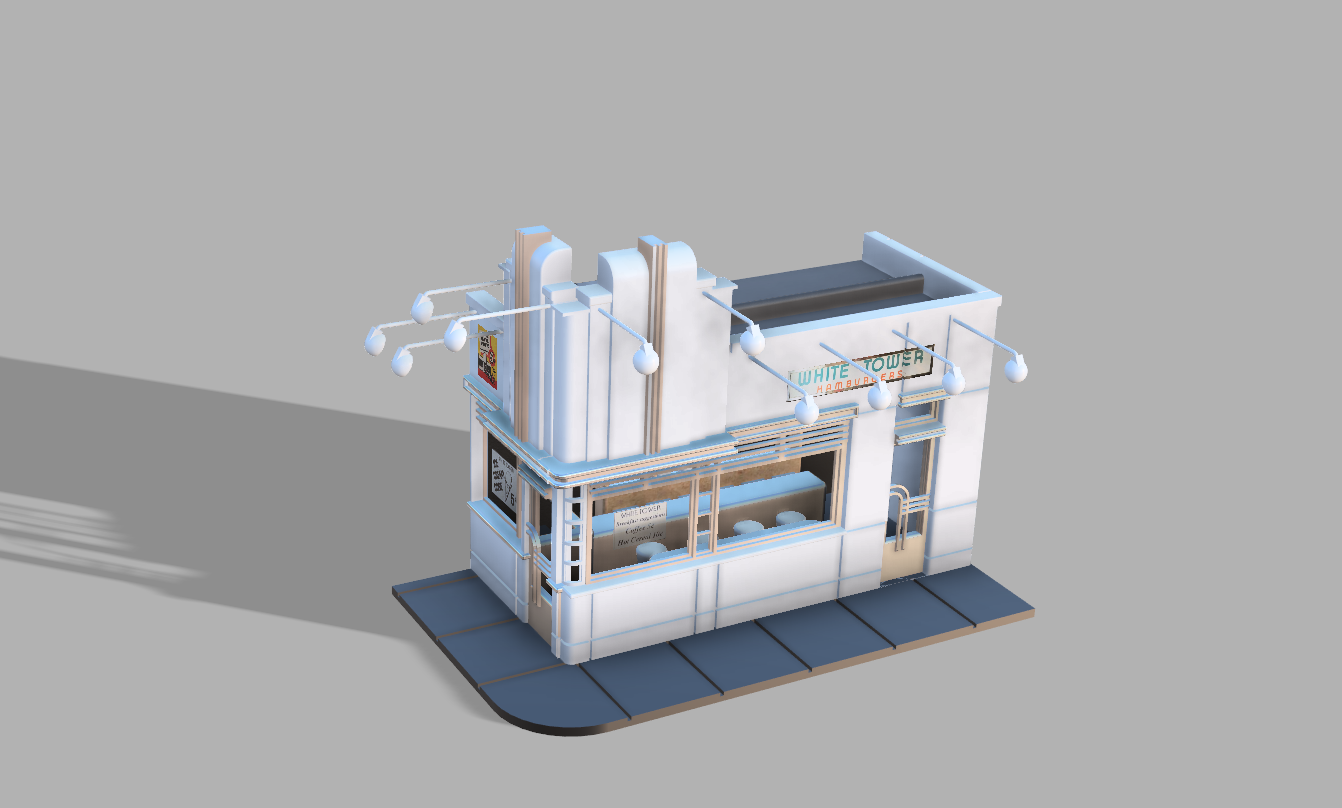
The completed model in the Fusion 360 program.
Printing, Painting and Assembling
I broke my model down into about 20 pieces for printing. After some
experience with 3D printing, I learned that flat, low profile pieces
print the best. Each wall, door, and window were printed as separate
pieces. Some filing and sanding was required.
I then painted the sections. If I were to do this project
again,
I would be more careful to break the model into pieces that were each
one color. Doing that would let me print the trim using an
aluminum/silver PLA
and avoid any painting. Except for some details, there were only two
colors involved – for the walls and towers, I used MicroLux
Reefer White and for the window framing, door handles and
tower detail,
I used Createx
Wicked Aluminum. I brush painted everything.
Then, finally, I glued the walls, base and roof together using model
airplane glue.
Signs were printed on my color inkjet printer from images found on the
web and in Mike’s original article. I used thin plastic for
the window "glass".
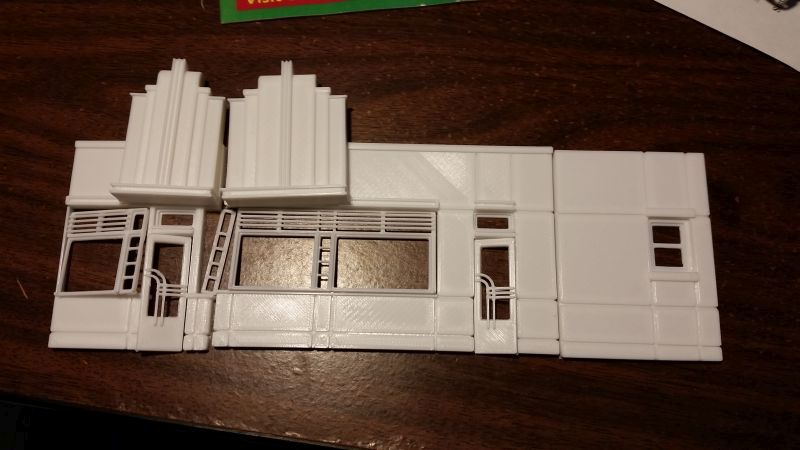
Printed pieces making up the front, side and rear walls before assembly
Assembled model on my workbench
I originally did not design an interior but after I saw the model
assembled, I realized that it needed one. I designed and built a simple
interior that, through the windows, looked “good
enough”.
The interior generally follows what was in the
1993 MR article but with much less detail. Everything, except some of
the
tiny detail parts on the counter and shelves, was printed on my printer.
The guy in my White Tower behind the counter is a street sweeper from a
Model Power "Station Service Crew" #6050. I don't remember right off
where the other two people come from. Other 1:48 people makers are MTH,
Bachmann, Artista, Woodland Scenics, Life-Like, Preiser and K-Line.

Simple Interior
I added LEDs for interior lighting. Here is early morning at the White
Tower. The cop was happy because he got his morning donut. I did not
try to
light the exterior but I think it needs it and I will have to work out
something.

Completed model on my layout
This project gave me an avenue to learn a lot about 3D printing and its
application to my model train layout. There was a lot to learn but
I’m pleased with the results.
My Fusion 360 design file and the 3D printer “.stl”
and
“.gcode” files are available in this zip file:
White
Tower.zip.
The design files are copyright by Mark DiVecchio. You can use,
redistribute and/or modify it under the terms of the GNU
General
Public License as published by the Free Software Foundation,
either version 3 of the License, or (at your option) any later version.
See <http://www.gnu.org/licenses/>.
Summary
It was a lot more work than
I thought. One big part was learning the Fusion 360 program well enough
to be effective.
This project showed the limitations of 3D printing and the advantages.
The small features were difficult to print. The window bars and the
curved door handles were a challenge. The floodlight and support arm
were the most difficult. I printed them at least a dozen times before I
found an orientation and support/raft structure under it that finally
gave me more than just a blob of PLA on the print bed. I did this
design in inches since that is how the original model was done. The
smallest feature that I
was able to print was 0.04". The round arms holding up the lights and
the square bars on the windows and doors are 0.04" across.

This
photo is my print of the 10 lamps needed.
The really big advantage of the Fusion 360 program is being able to
change
dimensions without having to first cut plastic. Fusion 360 lets you go
back an unlimited number of steps and change a dimension. Then it moves
forward through your subsequent steps and that new dimension is applied
automatically.
The "Combine" function in Fusion 360 was the most helpful. I built up
each
section of the building based on the drawings in the Model Railroader
article. I forgot to consider that some of sections from different
views will overlap when the model is assembled. The combine function
let me take two walls, for example, put them together in their actual
orientation and then the program would exactly cut out of one wall just
enough plastic so that the two walls will glue together perfectly. This
really helped on the front and side towers.
I did have to paint the building white. The white PLA that I had was
too translucent. I had bought it to do the windows on my P&LE
Locomotive Shop. Next time (Ha!) I would use a more opaque
white and an aluminum/silver PLA to save painting.
To do that, I would have to change how I "chopped" up the building for
printing. Next time, I would chop it at the split between the white and
the aluminum/silver colors. Then print each piece with the
appropriate color PLA.
The floodlights and support arms turned out to be really delicate. I've
broken about 8 of them trying to get the 10 I needed. Next time, I
would print them with 100% infill to try to make them more sturdy. I
did not glue them into their mounting holes as I know I break 1
or 2 each time I touch the building.
I printed at 0.2mm but again, next time, I might do 0.1mm. That will
double the print time so I'm not convinced. I did print my Locomotive
Shop at 0.1mm. The Shop had 7 wall sections with two pieces each and
each piece
took between 6-8 hours to print (you can do the math). The Locomotive
Shop wall had
really tiny bricks and tiny grout lines in between.
Still to do
The outside lights and support arms need to be
painted aluminum.
Actually light up the outside walls.
References
Here is a photo from Mike’s 1993 Model Railroader article:
Email with Mike Tylick
8 Dec 2017
Michael,
I've been carrying around your White Tower article from the March 1993
issue of MR for just about 25 years. I was captivated by your model
from the first time I saw it but I did not even come close to having
the skills to construct it.
So now I have something to help me, 3D printing. Using the Fusion 360
program and the drawings in your article, I printed a reasonable
version of your White Tower restaurant for my layout. My interior is
much less detailed though.
I thought you might enjoy seeing this.
Mark |
9 Dec 2017
Wow - it must
have taken quite a bit of work (and printing material) to
make this. What a neat job. Perhaps you should try
to sell
these.
Thanks for
sending this to me.
Mike T
www.raildesignservices.com
|
This site prepared and maintained by Mark DiVecchio
email : markd@silogic.com
SD&A
HOME
Mark's Home Page
The DiVecchio
genealogy home page
The Frazzini
genealogy home page
This site will be under construction for a while.